
Ever stared at your battery monitor and inverter/charger screens, wondering why the numbers don’t quite match up? Or why your battery charges at 70A on a portable generator, but jumps up to a blistering 160A when plugged into shore power?
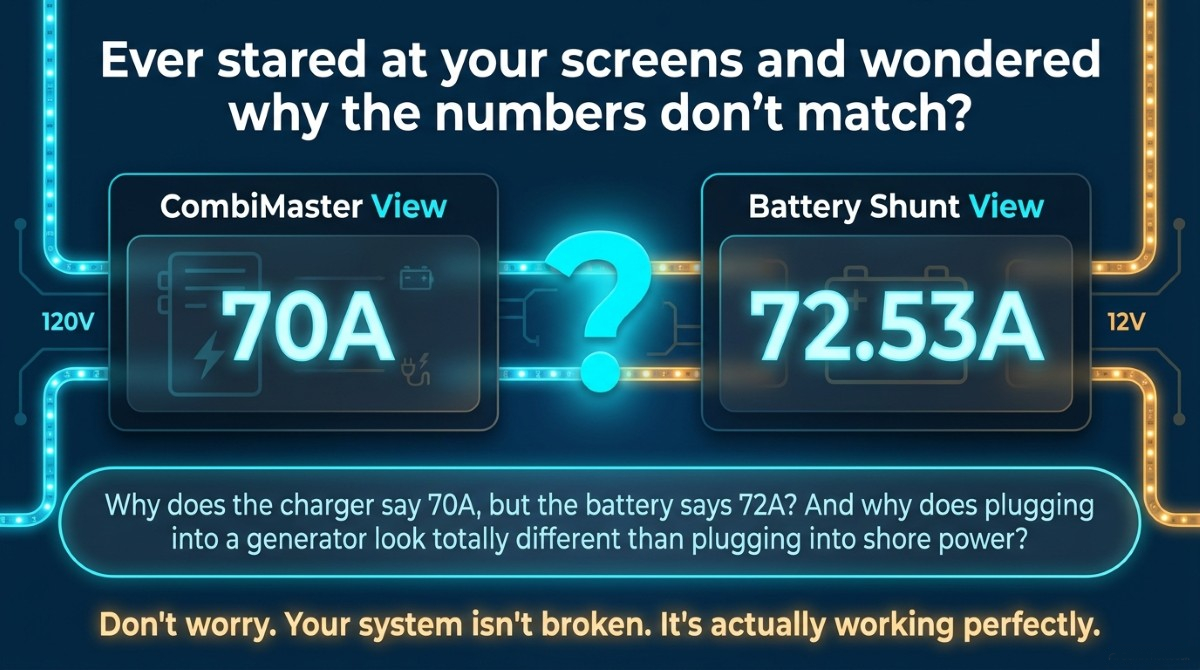
If you are running a Mastervolt CombiMaster 12/3000 inverter/charger in your RV, van, or boat, seeing different meters measure the system from different points can seem confusing at first. However, once you understand how power flows through pass-through mode and onto your battery shunt, those numbers tell a perfectly aligned story.
Here is the complete line-by-line guide to reading your displays when running on
- Generator Power and
- 30A Shore Power.
Part 1: Decoding Your Display Readouts
When monitoring your power system during AC charging, you are looking at two separate monitoring points on your electrical network:
📱 Top Screen: CombiMaster View
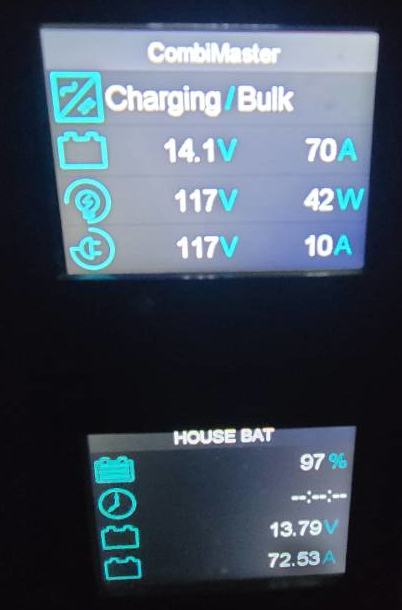
This screen shows what the CombiMaster inverter/charger unit itself is doing in real time.
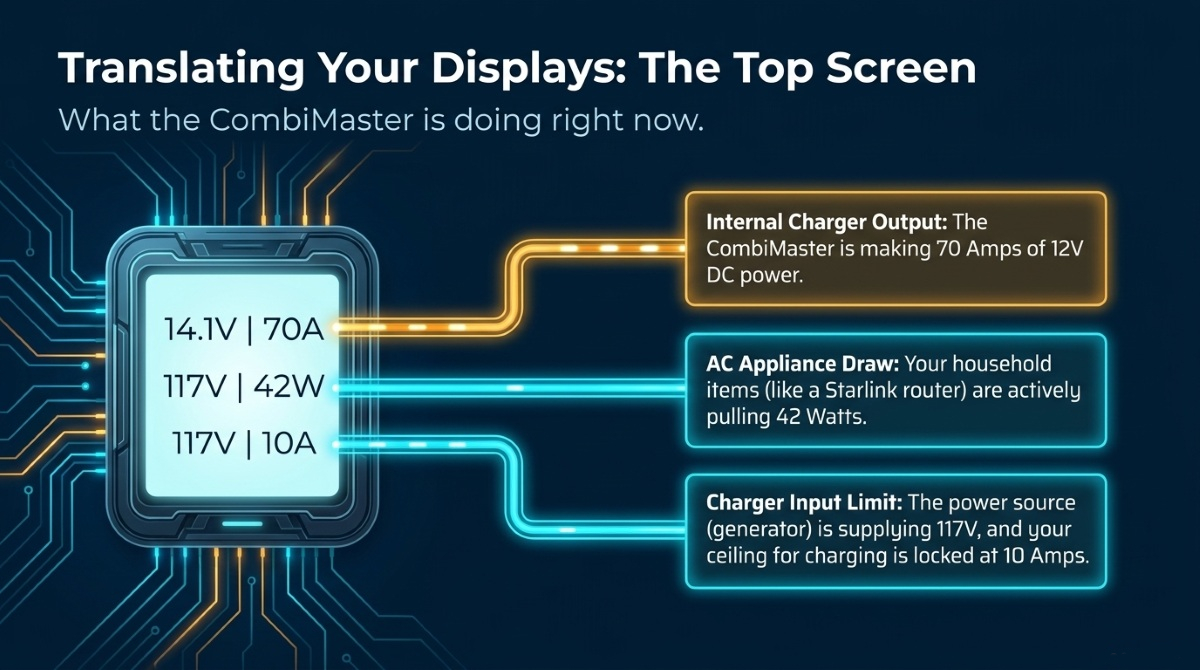
- 🔋 14.1V | 70A (Top Line): The CombiMaster is actively in its “Bulk” charge stage, outputting 70 Amps of 12V DC power from its internal charging engine.
- 📺 117V | 42W (Middle Line): This is your active AC appliance draw (such as your Starlink router and other electronics), pulling 42 Watts at 117 Volts AC.
- 🔌 117V | 10A (Bottom Line): This is the Total AC Input Current coming from your power source. This is also where you set your Charger Input Limit by using the two buttons (up to 30A). I mostly set it to 10A.
- IMPORTANT – The number shown is the Total AC Input Current coming from your power source. In this case there is no major load so the number stays at 10-11A (which is the charger at work). Should you run a large load, this number may jump to 14A or higher (see below).
This Bottom Line display number is confusing. It shows 3 different numbers depending on the Combimaster status:
- Inverting Mode – The number is always 0 because there is no current being pulled from a power source. You are not connected to an outlet at a campground or a generator.
- Charger Set Mode – You are using the two buttons underneath it to set the Charger Input Limit. I recommend to keep this setting at 10A unless you want faster charging.
- Charging Mode – You are connected to an outlet at a campground or a generator. The number shows the current being pulled from the power source. This number should alwys be at or near the number you set.
When It WILL Read Close to Your Setting During the Bulk charging phase (when the battery is below ~80%–90% full):
- Appliances Idle: The charger absorbs all headroom up to your limit (for example, set to 10A -> reads ~10A).
- Appliances Running Below Limit: If you run an 8.45A load on a 10A setting, the charger takes the remaining 1.55A, keeping the total incoming AC right around ~10A.
The Three Exceptions When It Will NOT Match the Setting
- Battery is Nearly Full (Absorption and Float Phases): Once the battery reaches its target voltage, the battery naturally tapers down how much current it accepts. As charge current drops toward zero, total input current will fall far below your limit (for example, reading 2A to 4A even if your limit is set to 30A).
- Appliances Exceed the Setting: If an appliance demands more than your limit (such as running the ~12A microwave on a 10A limit), the pass-through relay feeds the appliance directly, causing the reading to jump above your limit to ~14A.
- Setting Exceeds Physical Charger Capacity: On a 30A setting with no appliances running, the CombiMaster 12/3000 charger maxes out around 160A DC (~18A to 22A AC input). Because the charger physically cannot pull 30A on its own, the display will peak around ~18A to 20A instead of 30A.
🔋 Bottom Screen: Battery Shunt View
This is a physical battery monitor connected directly to a shunt at your battery terminal, measuring the net power actually entering the physical battery cells.
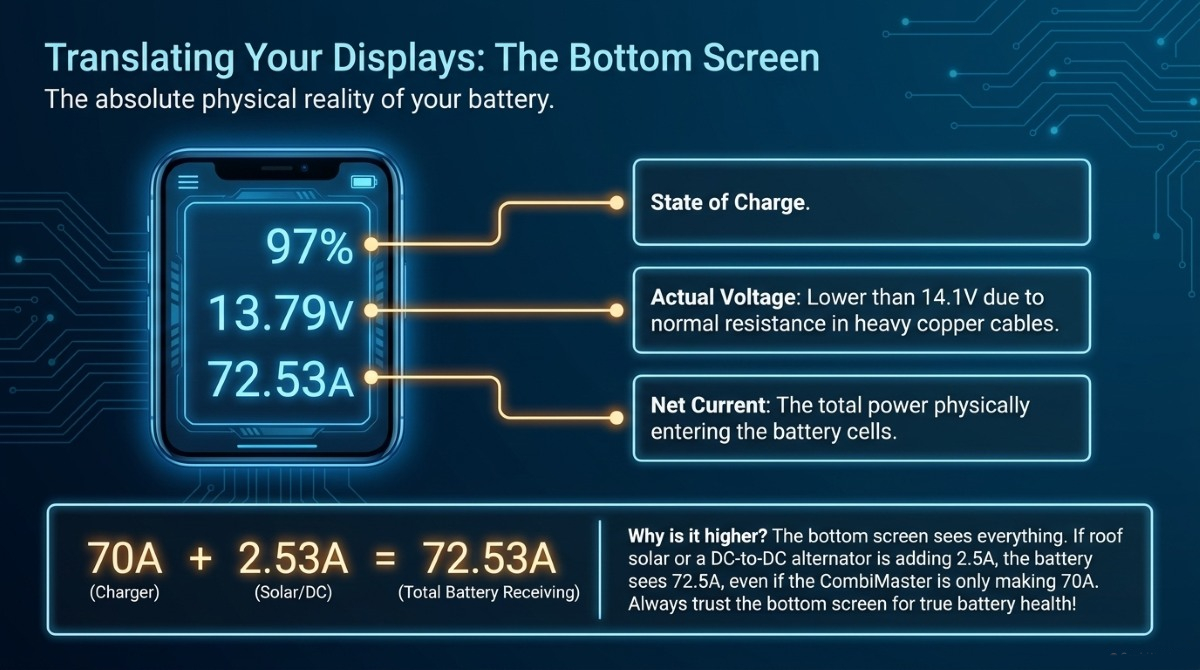
- 97%: Your LiFePO4 battery is nearly full.
- 13.79V: The actual resting voltage of your battery bank under this heavy charging load.
- 72.53A: The total net current entering the battery.
🧩 Why is the Battery Shunt (72.53A) HIGHER than the CombiMaster (70A)?
Usually, running appliances reduces net battery charging current. So why does the battery shunt show 2.53 Amps more than what the charger outputs?
- Secondary Power Sources (Solar / DC-to-DC): If you have solar panels on your roof or a DC-to-DC alternator charger running, they are injecting an extra ~2.5A into the battery bank in parallel. The CombiMaster display only knows about its own 70A output, whereas the battery shunt measures all combined current flowing into the battery posts.
- Voltage Drop & Sensor Calibration: The CombiMaster measures current internally at 14.1V before it leaves its chassis, while the battery reads 13.79V due to minor resistance across heavy copper cables. A 1–2A variance between two different manufacturer sensors is completely normal.
Part 2: Operating on Generator Power (10A AC Charger Input Limit)
Understand this – the Combimaster does not know how powerful the power source is! As a result, it does not know how fast it can charge the battery. Are you plugged into a 30A (the max) pedestal at a campground, a 15A outlet at your house, a 20A outlet, or a generator?
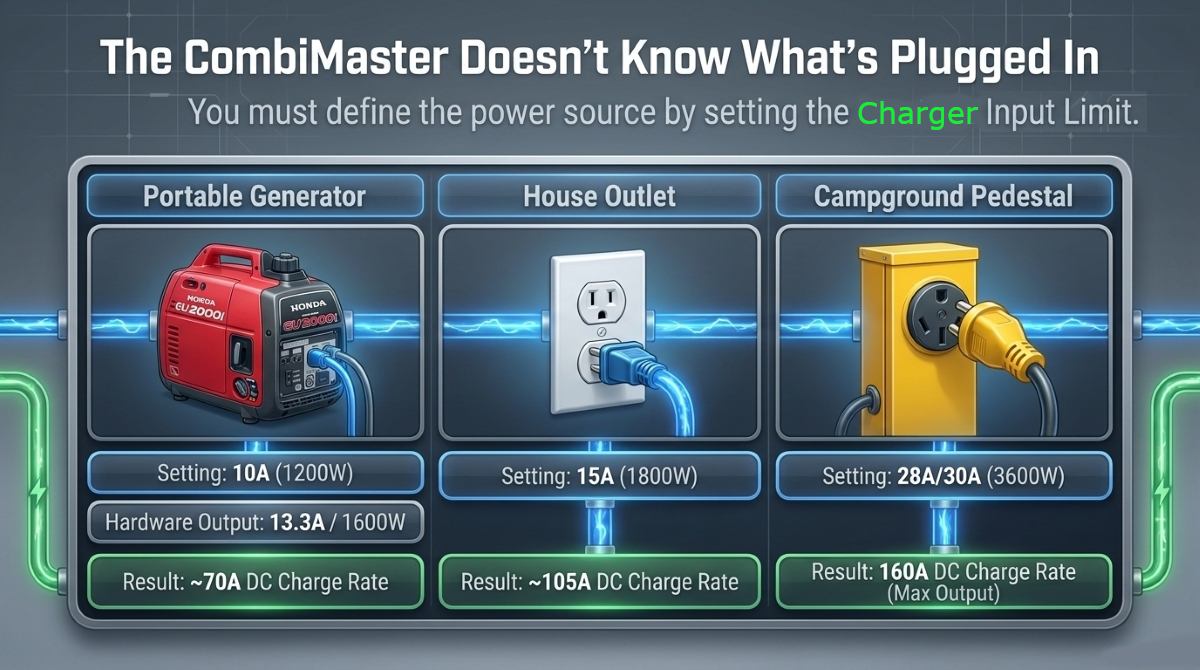
You tell it by using the Charger Input Amps Setting (the two buttons on the upper display). This tells the Combimaster the upper limits of its charger input Amps.
- 10A-12A (1200W+) – Honda 2000i generator (13.3A with continuous 1600W and short surges of 2000W)
- 15A (1800W) – 15A outlet
- 20A (2400W) – 20A outlet
- 30A (3600W) – 30A outlet (setting to 30A actually caps charging internally at 28A)
Input Limit vs Max Bulk Amps (real world):
- 10A-12A (Honda) = ∼70A+ DC
- 15A (house) = ∼105A DC
- 20A = ∼140A DC
- 30A (pedestal) = 160A DC max
TIP – I keep mine at 10A regardless of the power source. This is a good starting point. Whenever I need the battery to charge faster, I will dial it up to 12A (generator) or higher as shown for the other power sources.
BUT Be Aware – Often the power sources do not deliver the power they promise. A campground outlet or house outlet may be on a shared circuit that can easily overload. This is another reason why I dial the Charger Input to only 10A.
RULE OF THUMB – NEVER set this higher than your power source. For example, do not set this to 30A when running a 13.3A generator. The charger does not automatically scale itself down unless some appliances are running. It will cause the source to stutter and the Combimaster will reset, only to repeat this unhealthy cycle.
If your battery is low, the Combimaster Charger will maximise these power source settings to charge as fast as possible. As long as your power source is delivering the Watts as advertised, and you are not running any appliances, the battery will charge at these set rates.
For the generator, it caps the Combimaster charger to 10A (1200W) instead of pulling an insane 30A or 3600W from the 13.3A or 1600W generator to charge the battery.
Without this setting (or forgetting to adjust the setting from the 30A max), the generator will get overwhelmed and may die. If you also try to run the AC or microwave, expect an overload on the generator because both the charger and the appliance are trying to pull as much as they need!
Why does the appliance pull as much as it needs?
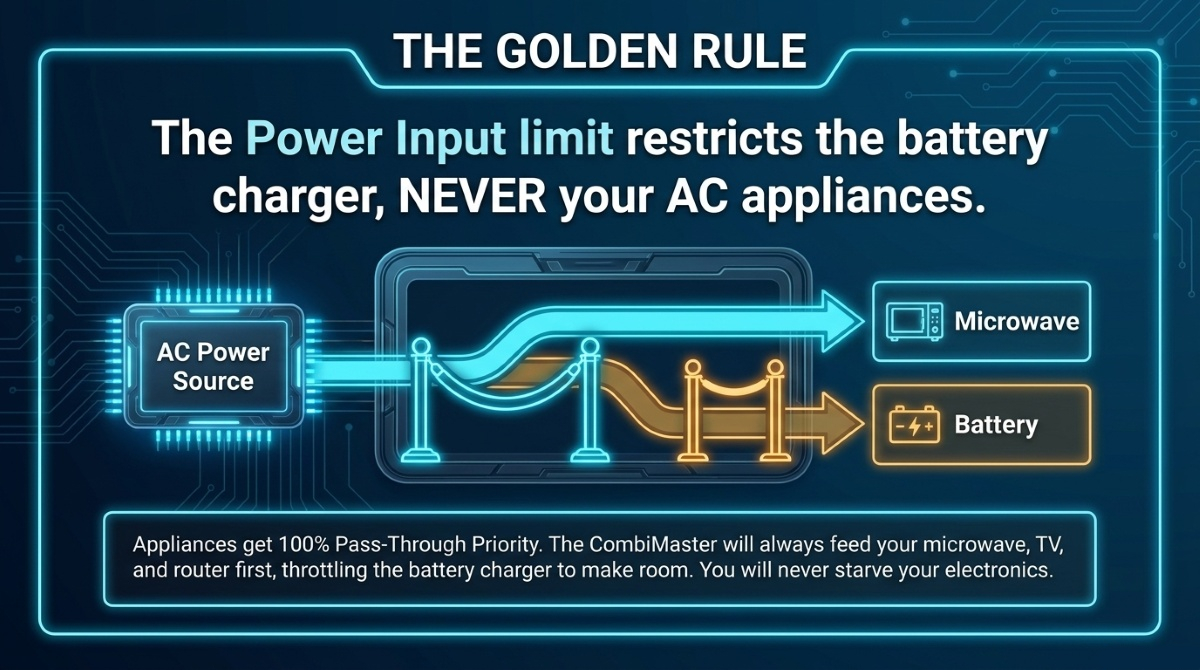
When plugged into a power source, the CombiMaster enters Pass-Through Mode. This means:
- running appliances get priority and full power directly from the source.
- the charger is secondary and will adapt by lowering its needs.
The scenarios below illustrate this concept by showing what happens when you run a microwave while connected to the Honda generator.
Why Does the Screen Read 117V Instead of 120V?
What power cable are you using? Cheap extension cord (in this case)? 30A cable?
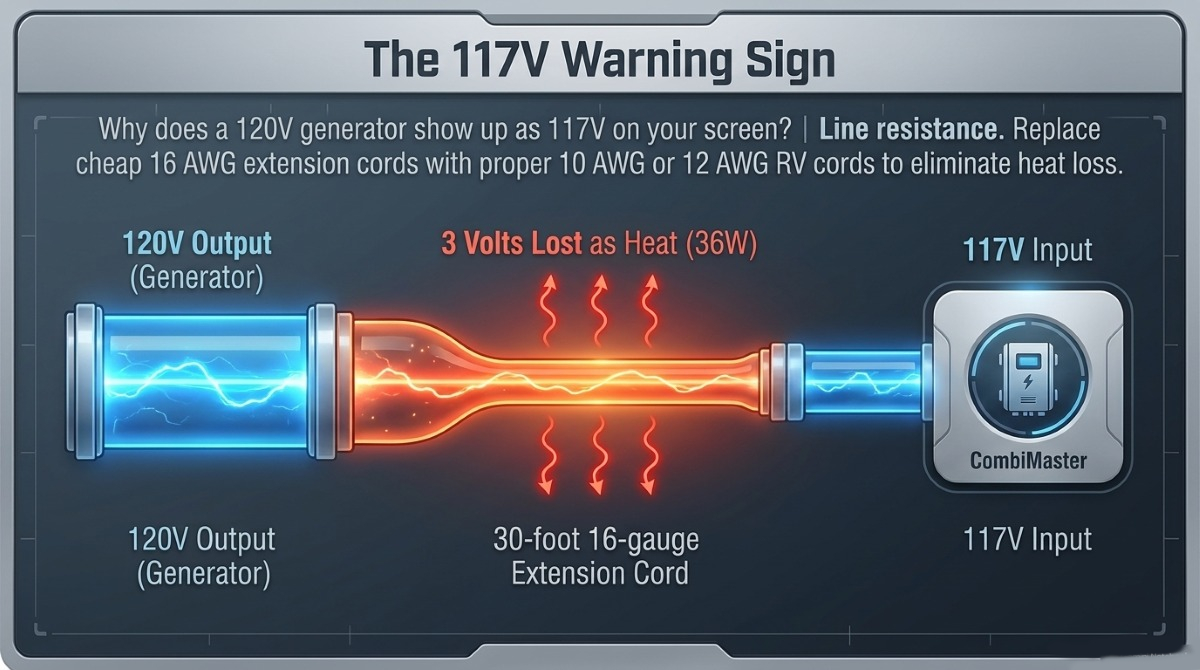
When a portable generator (like a Honda EU2000i) outputs 120V AC at its front panel, passing that current through a 30-foot, 16-gauge extension cord causes electrical resistance. The cord consumes about 3 Volts in voltage drop, leaving 117V AC available at the charger.
IMPORTANT – This 117V reading is a warning – replace that 16AWG cord with a 12AWG or 10AWG RV cord. You’re losing ∼36W as heat in the cord itself!
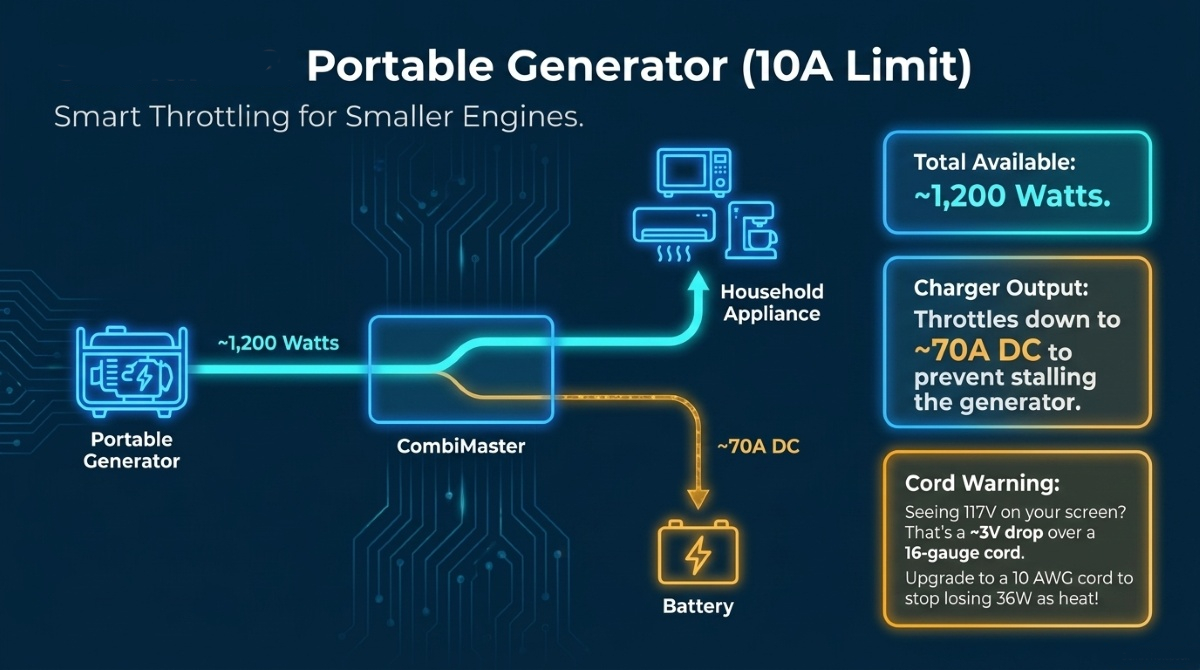
The Pass-Through Math Breakdown
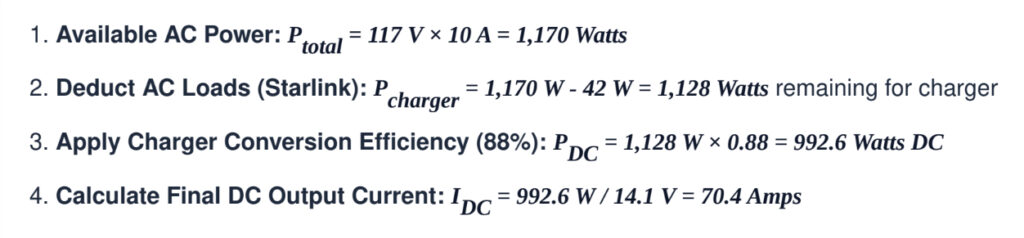
Result: The physical formula predicts 70.4 Amps, perfectly matching your live display readout of 70A!
Generator Input Tuning & ECO Mode Recommendations
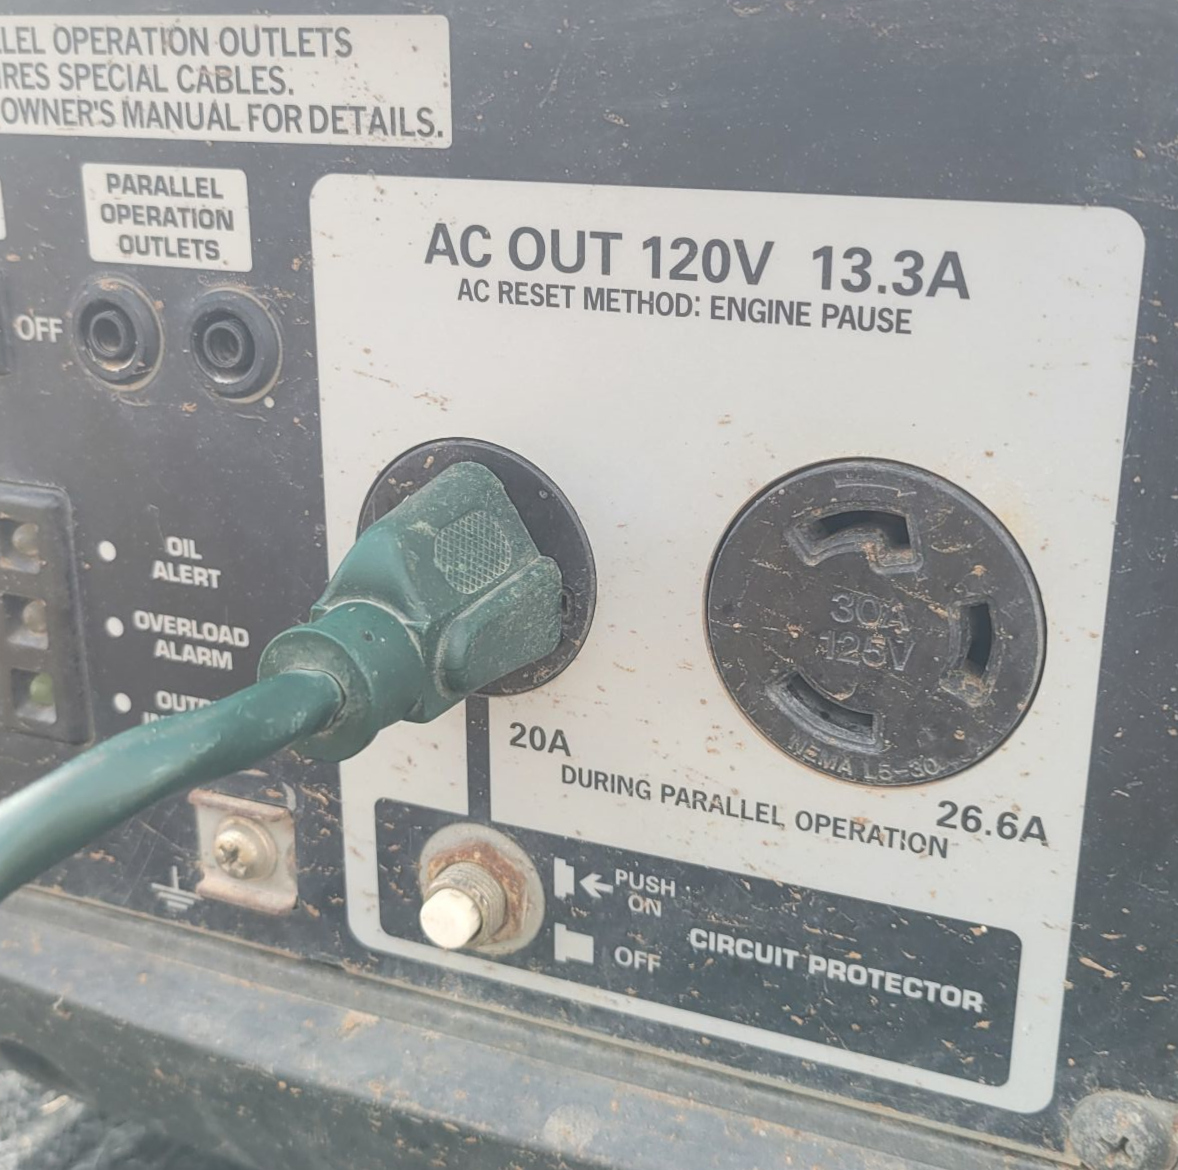
A standard 2000W generator faceplate specifies a continuous maximum output of 13.3 Amps (120V AC OUT 13.3A). Here is how you should set your CombiMaster charger input limit:
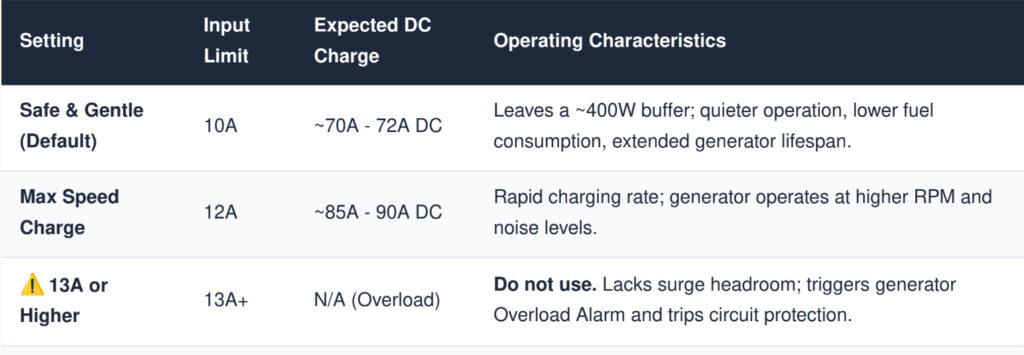
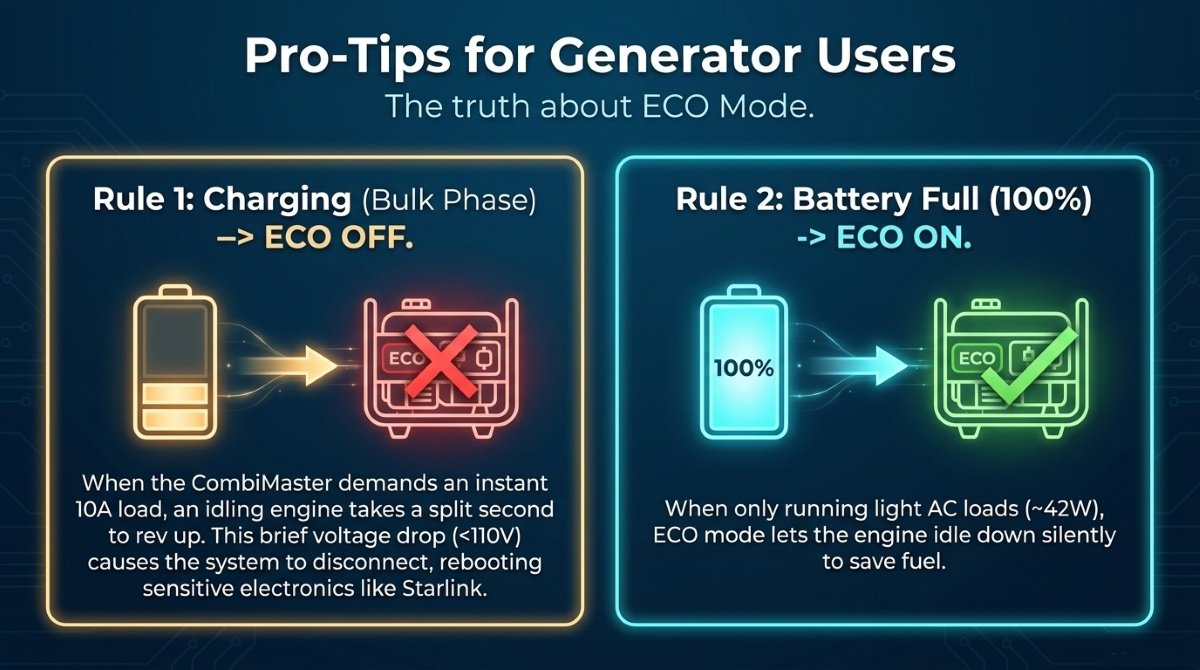
⚠️ Should You Run Your Generator in ECO Mode?
- When Charging (Bulk Stage @ 70A): Keep ECO Mode OFF. When the CombiMaster demands an instant 9A–10A load, an idling engine takes a split second to rev up. This brief voltage drop (<110V) causes the CombiMaster to detect “poor AC power”, disconnect, and trigger a reconnect loop—potentially causing sensitive electronics like Starlink to reboot.
- When Battery is Full (100% SOC): Turn ECO Mode ON. When you are only running light AC loads (~42W Starlink), ECO mode allows the engine to idle down silently and save fuel.
Part 3: Operating on Shore Power (30A Pedestal)
When plugged into a standard 30A RV park pedestal using a thick 10-gauge (10 AWG) shore power cable, line resistance over short distances is virtually zero. Your CombiMaster receives a solid 120V AC input.
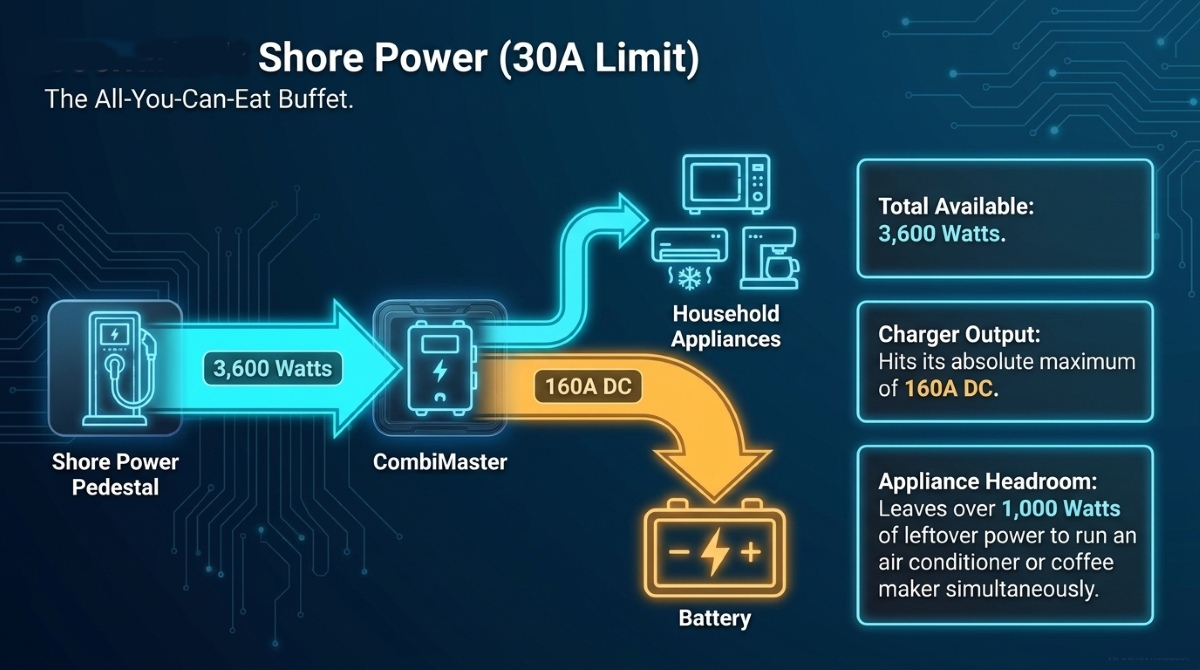
When you update your CombiMaster input limit setting to 30A, you unlock the charger’s full potential:
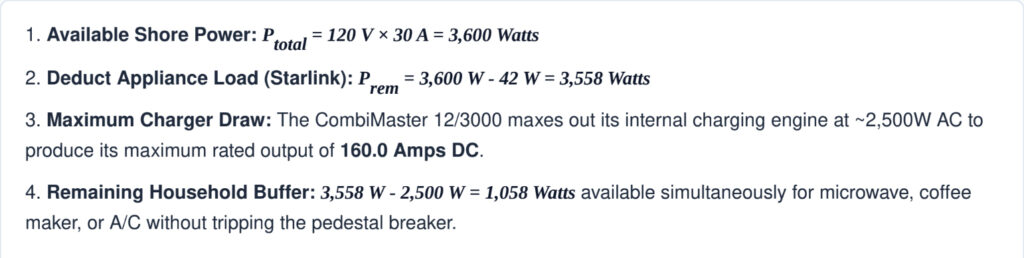
Unlike on generator power, 30A shore power allows the CombiMaster 12/3000 to hit its maximum rated charger output of 160A DC, while still leaving over 1,000 Watts of leftover AC power to run an air conditioner, microwave, or coffee maker!
I call this very fast charging, but be careful! Do not be tempted to run A/C, hair dryer and microwave all at the same time! You will most probably trip the pedestal.
TIP – This is why I keep the Charger Input Setting = 10A. It leaves a lot of Watts for simultaneous appliance usage and the only negative is slightly slower charging!
Part 4: Display Hardware Note (MasterView vs. EasyView 5)
If you are navigating your system screens, it helps to know which display generation you are using:
- Legacy MasterView Series: Older generation display panels with monochromatic text lines, rigid menus, and physical rubber directional buttons. The display images in this article are MasterView displays.
- Modern EasyView 5: The current standard featuring a 4.3-inch color capacitive touchscreen with an IP67 waterproof front and customizable home screen widgets.
Tip: If your display panel has a sleek glass front with a glowing white circular physical touch button right below the screen, you are using the EasyView 5 system.
Summary Checklist
- 70A vs. 72.5A difference? Normal! The shunt counts extra incoming power from solar/DC-DC chargers.
- 117V reading on Generator? Normal! Caused by ~3V drop over a 16-gauge extension cord.
- Generator Charging Limit? Set to 10A for quiet daily use; 12A for fast charging. Keep ECO Mode OFF while charging.
- Shore Power Limit? Set to 30A to unlock full 160A DC battery charging with over 1,000W of appliance headroom remaining.
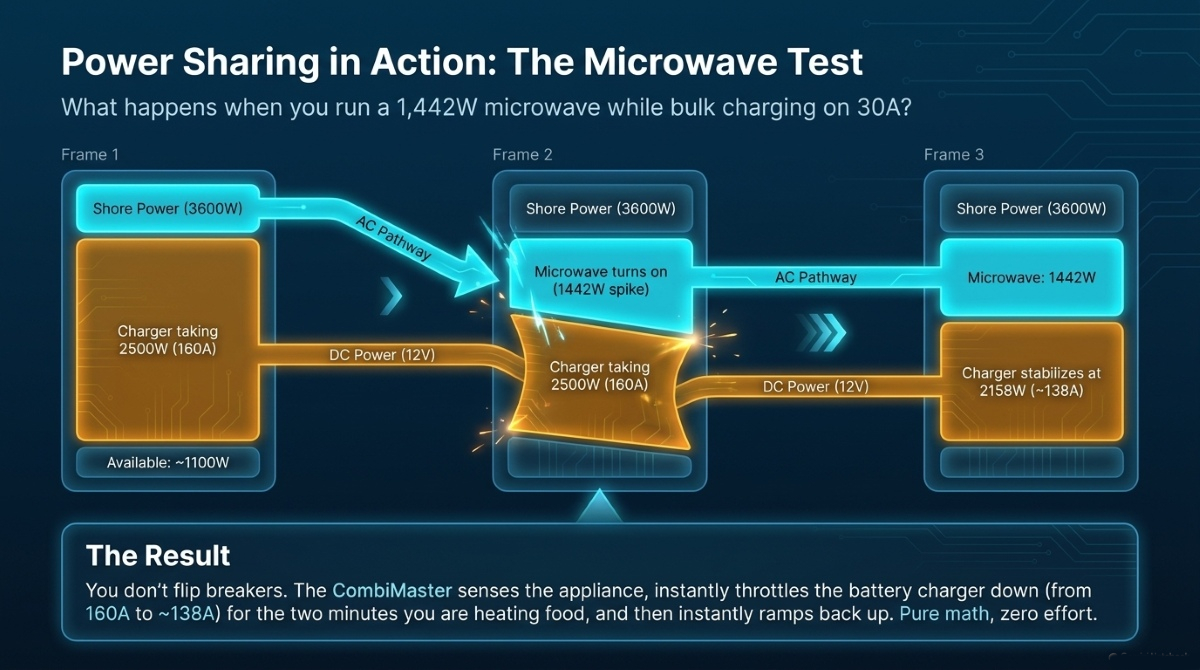
Part 5: How can one run a 1400W microwave while bulk charging on 30A shore power without pushing buttons or flipping breakers!
The Mastervolt CombiMaster 12/3000 has built-in smart power management specifically engineered for this exact scenario.
1. The Math on 30A Shore Power
When plugged into a 30A RV or marine pedestal (120V), your total continuous available power pool is 3,600 Watts.
Total Available Power=120 V×30 A=3,600 Watts
Active Household AC Draw=1,400W (Microwave)+42W (Starlink)=1,442 Watts
Remaining Power for Battery Charger=3,600W−1,442W=2,158 Watts
2. How the CombiMaster Handles This “Power Sharing”
When your battery charger is in Bulk mode on 30A shore power:
- Pass-Through Priority: The CombiMaster always gives household AC appliances (outlets, Starlink, microwave) 100% priority over battery charging.
- Automatic Throttling: The moment you press “Start” on the microwave, the CombiMaster senses the sudden 1,442W load and automatically throttles its charger engine back from its maximum ~2,500W draw down to the available 2,158W.
- Dynamic Bulk Rate: Instead of outputting its absolute maximum of 160A DC, the charging current seamlessly scales back to approximately 135A – 140A DC for the 2 or 3 minutes the microwave is running.
- Instant Recovery: As soon as the microwave finishes heating, the CombiMaster instantly ramps the charger back up to 160A DC.
The Bottom Line: Your microwave runs at 100% full heating power, your Starlink never glitches, and your LiFePO4 battery continues bulk charging at a rapid ~138A rate.
3. What Happens on Lower Power Sources (15A Shore or Generator)?
If you ever need to use the microwave when plugged into a 15A household outlet or running on a 10A generator setting, total available AC power is less than the 1,442W appliance draw:
- On 15A Shore Power (1,800W Total): The CombiMaster throttles the charger down to ~22A DC while the microwave runs. As long as your charger input limit is set to 15A, it will not trip the breaker.
- On 10A Generator Charger Limit (1,170W Total): See Part 6 below for an explanation.
Part 6: Using a Generator, a 30A RV Cable, a Galanz Microwave and 10A Charging Input
The official manufacturer specifications for the Galanz GSWWD09S1A09A (0.9 cu. ft. Air Fryer / Convection / Microwave):
Manufacturer Electrical Specifications
- Rated Microwave Output Power: 900 Watts
- Operating Voltage: 120 V / 60 Hz
- Rated AC Power Input (Microwave Mode): ~1,350 Watts (approx 11.25A to 11.5A at 120V)
- Rated AC Power Input (Convection / Air Fry Mode): ~1,400–1,500 Watts (approx 12A to 12.5A at 120V)
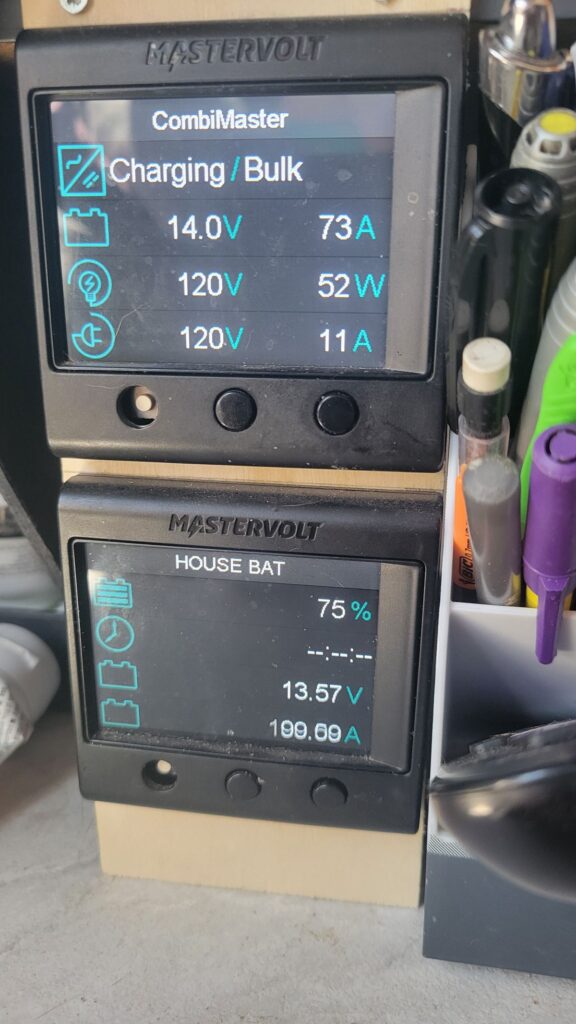
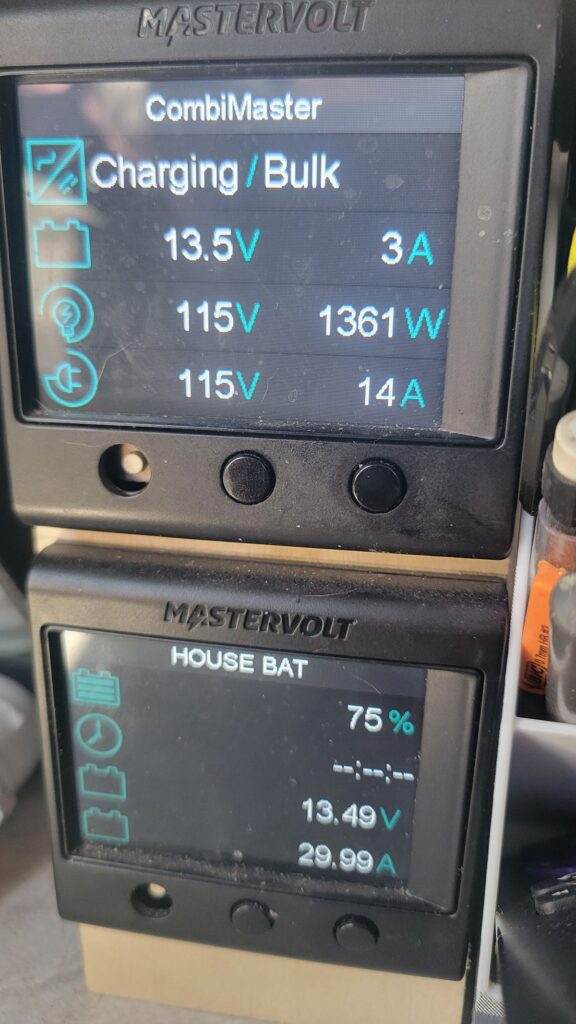
Double-Checking Your Numbers

Why a 900W Microwave Draws 1300+ Watts
A microwave’s 900 W rating refers strictly to the cooking output power generated inside the cavity by the magnetron.
Due to the efficiency losses of transforming 120V AC into high-voltage DC for the magnetron (typically 65%–70% efficient), plus the power consumed by the exhaust fan, turntable motor, and internal light, a 900W output microwave requires approximately 1300W–1350W of actual AC input power.
At 115V, 1300 W equals 11.3A AC. Added to Starlink’s 0.5A, the appliances consumed roughly 11.8A, leaving the CombiMaster with just enough headroom under your generator limit to pull the remaining 2.2A for that 3A DC trickle charge.
Because that combined 14A total stayed within your AC input limit, the generator carried the full load without needing battery assist.
What is Power Assist?
Power Assist (also called AC IN Support Mode) is an intelligent feature in the CombiMaster designed to prevent your generator or shore power breaker from overloading when heavy appliances turn on. You enable it with dipswitch 7 on the Combimaster.
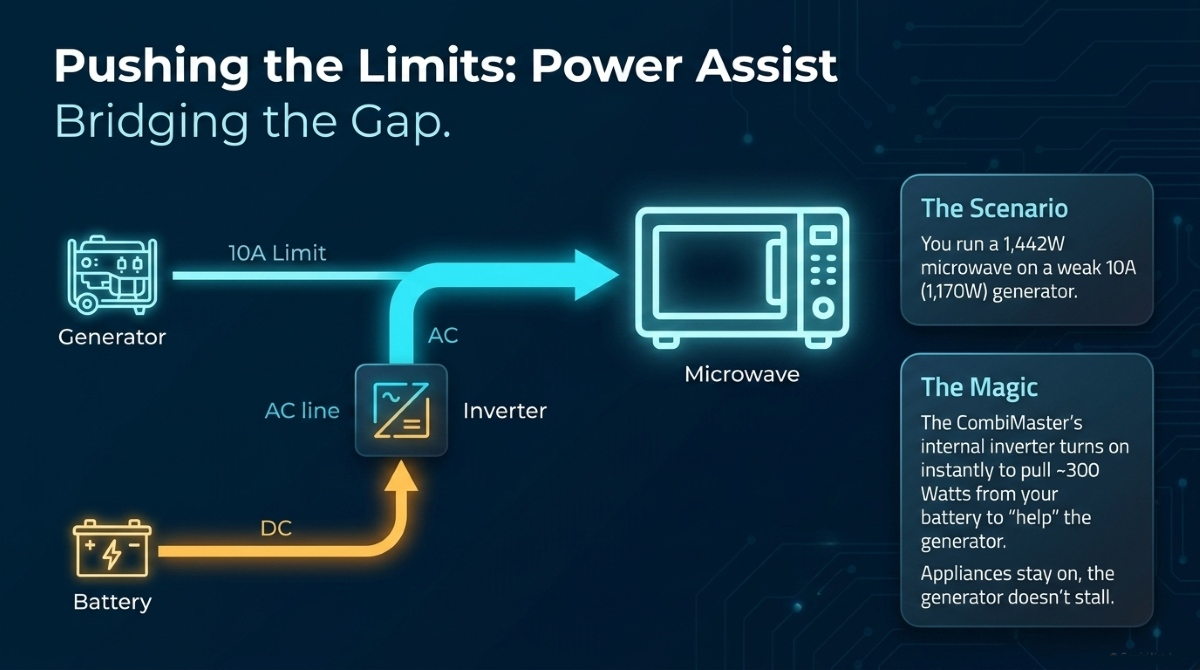
When the Combimaster senses that a power source is struggling with a load, it immediately stops charging the batteries and synchronizes the inverter with the incoming AC power.
It then draws energy directly from the LiFePO4 battery bank, converts it into AC power, and injects that extra current in parallel onto the AC lines to share the load alongside the power source.
But the Honda 2000i Generator is rated for 13.3A. Why did it it not overload or trigger Power Assist?
Portable generators like the Honda EU2000i have two different output ratings:
- Rated (Continuous) Output: 13.3A – 1600W — The load it can run indefinitely without thermal buildup or stress.
- Maximum (Peak/Surge) Output: 16.7A – 2000W — Short-term reserve capacity designed to handle startup spikes and temporary high loads (typically up to 20–30 minutes).
Why 14A Works
At 14A, the generator is operating just slightly above its continuous 13.3A baseline and well below its 16.7A overload ceiling.
- Short Cooking Cycles: Because a microwave usually runs for only a few minutes, the generator comfortably absorbs the 14A draw using its short-term headroom without tripping its internal inverter overload circuit.
- CombiMaster Power Assist Did Not Activate: The CombiMaster is always ready to assist with power needs but in this case the generator handled the 14A very comfortably. The Combimaster did not sensed hardship and the Power Assist feature did not kick in.
If that 14A demand were sustained for hours on end, the generator could eventually trip its electronic overload breaker to protect against heat buildup—which would force Power Assist to share the load.
REMEMBER – the number at the bottom of the CombiMaster screen is the Total AC Input Current coming from your power source, not just the battery charger setting.
Here is why it behaves exactly as you observed across each state:
1. In Inverter Mode (0 A)
- The transfer switch is open.
- There is no shore or generator power plugged in, so incoming AC current is 0 A.
- All power to run your household devices is being pulled from your LiFePO4 battery bank.
2. Generator Running: Ramp-Up to 10A (My Bulk Charging Setting)
- When the generator connects, the CombiMaster synchronizes and engages its internal charger.
- The CombiMaster’s algorithm slowly ramps up AC consumption to prevent stalling the generator until it hits your 10A setpoint.
- What the 10A represents here:
- approx 0.5A goes straight through to power Starlink (52 W).
- approx 9.5A is pulled by the internal charger to convert into heavy DC charging current (73A DC into the battery).
- The display shows 10A – 11A total incoming current from the generator.
3. Microwave Running: Jumps to 14A – 15A
- The Galanz microwave demands roughly 1300 W – 1350 W of actual input power (approx 11.5A – 12 A AC at 115V).
- Because the internal relay connects your AC panel directly to the generator, the microwave pulls its full current straight from the Honda.
- The CombiMaster throttles the charger: Seeing the total load, the CombiMaster immediately cuts the battery charger back from 73A DC down to 3A DC (which only consumes approx 0.5A AC.
- Why the incoming reading jumps to 14A: Total AC Input = Microwave (approx 11.8A) + Starlink (approx 0.5A) + Throttled Charger (approx 0.5A) + Internal Overhead (approx 1.2A) = approx 14A
Part 7: Running the Coleman Mach 11,000 BTU A/C with Softstart, and Starlink with the Generator (10A Charger Input Setting)
The display shows the Coleman Mach 11k A/C and Starlink running smoothly together, leaving enough generator headroom for the CombiMaster to sustain a modest bulk charge.
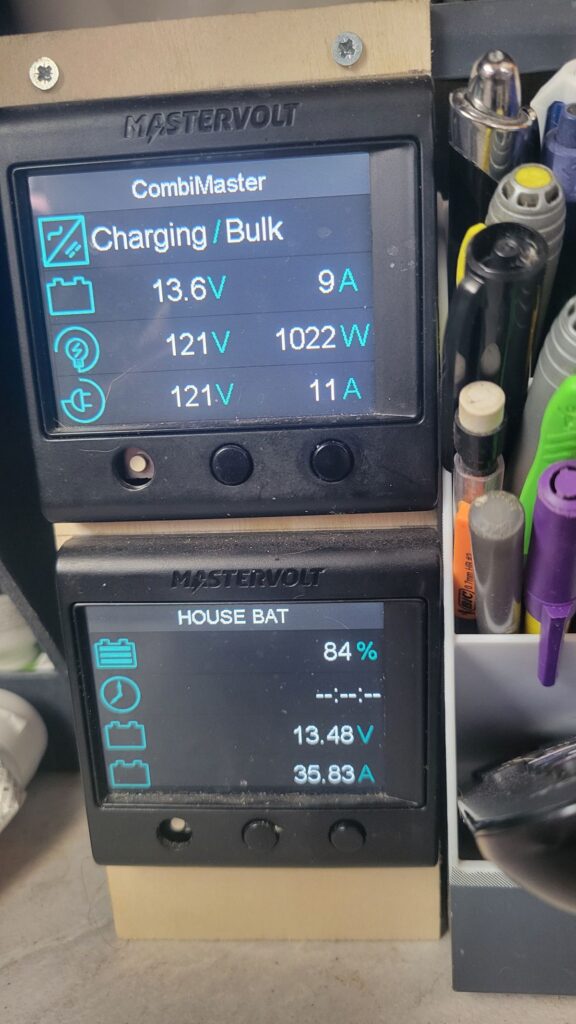
1. AC Household Demand (Bulb Icon)
- Power Draw: 1022 W at 121V
- Appliance Breakdown:
- Starlink: ~50W to 60W (~0.5A AC)
- Coleman Mach A/C: ~960W to 970W (~8.0A AC)
- Total Appliance Current: 1022 W / 121 V = 8.45A AC drawn directly through pass-through
2. Generator Input & Line Quality (Plug Icon)
- Voltage: 121V (clean line voltage with no sag, thanks to the 30A cable)
- Total Current Draw: 11A AC
- Generator Load Factor: Operating safely below the continuous 13.3A (1600W) limit, allowing the Honda to run without overload stress
3. Battery Charging & Power Distribution
- CombiMaster DC Output: Delivering 9A DC (~122W DC) into the house bank, using the ~2.5A AC headroom left over from the generator
- House Battery Net Current: 35.83A total entering the battery bank
- Formula: CombiMaster Output (9A) + Solar Controller Input (~26.8A) = Net Battery Charge (35.83A)
- State of Charge: 84% at 13.48V
Because the continuous running draw of the A/C and Starlink (~8.5A) stays below your generator limit, the CombiMaster does not need to throttle down completely or engage Power Assist, allowing both solar and generator to charge your lithium bank simultaneously.
Part 8: Display Readings when Inverting (Shore Power Disconnected and Inverter is ON)
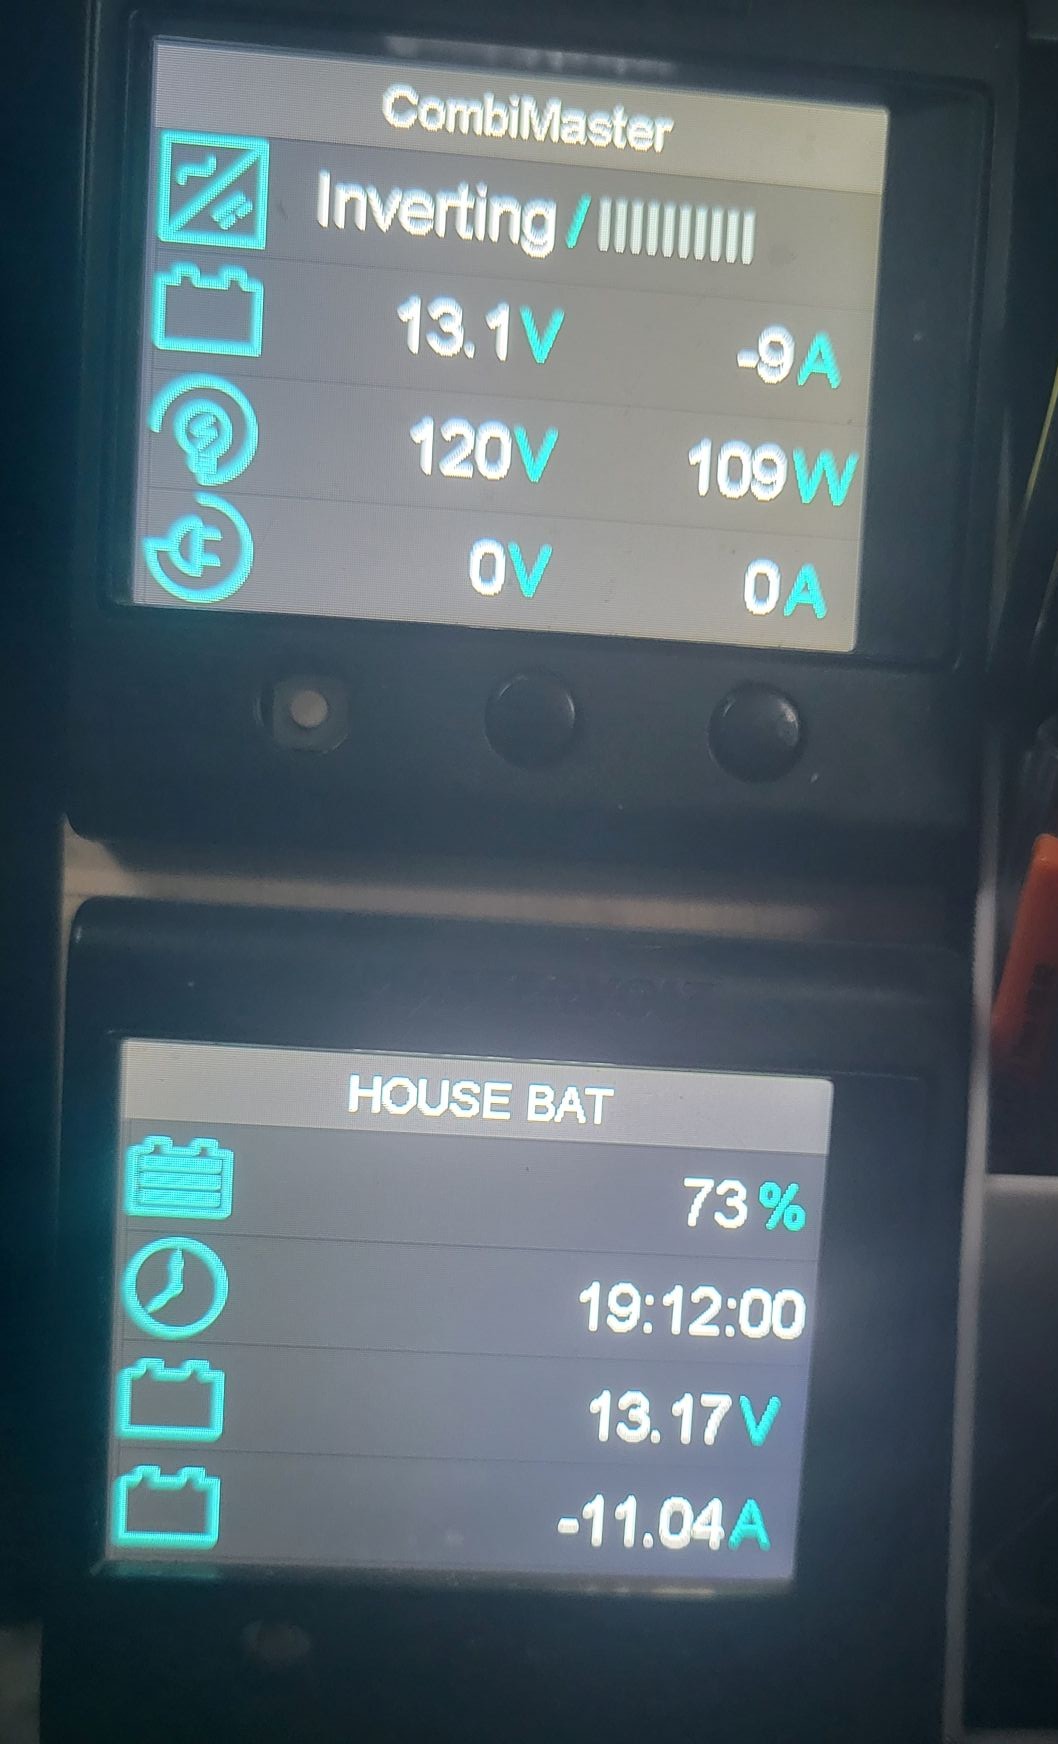
Switch INVERTER ON with the left button on the Top Display.
Now that you are in Inverting Mode, your system has completely flipped. The generator or shore power is completely gone (0V / 0A on the bottom line), and your LiFePO4 battery is now the sole power source running your entire setup.
Here is the exact story your two screens are telling you right now:
📱 Top Screen (CombiMaster View)
This tracks how the inverter is creating 120V household power from your battery.
- Inverting: The unit is actively pulling power out of the battery and converting it to household AC power.
- 🔋 13.1V | -9A (Top Line): The CombiMaster calculates that it is drawing roughly 9 Amps out of the battery bank to run the inverter engine. The minus sign (-) means power is leaving.
- 📺 120V | 109W (Middle Line): Your household AC electronics (like Starlink, a laptop, etc.) are currently drawing 109 Watts of total power. Because you don’t have extension cord losses right now, the CombiMaster is creating a perfect 120V line.
- 🔌 0V | 0A (Bottom Line): Confirms no generator or shore power is plugged in.
🔋 Bottom Screen (House Battery Shunt View)
This is the unrounded, physical reality at your battery terminal.
- 73%: Your lithium battery has plenty of capacity left.
- 19:12:00: Based on your current usage, you can run exactly like this for another 19 hours and 12 minutes before the battery hits empty.
- 13.17V: The real-time voltage of your LiFePO4 bank under load.
- -11.04A: This is the most critical number. It means a total of 11.04 Amps is physically leaving your battery cells right now.
🧩 Explaining the Amperage Difference (-9A vs -11.04A)
You will notice the bottom screen shows a larger drain (-11.04A) than what the CombiMaster says it’s pulling (-9A). This happens because of two factors:
- Your 12V Fridge & Lights are running: The CombiMaster’s top screen only knows about the power it is consuming to run your 109W AC appliances. It has no idea what your 12V fridge or overhead lights are doing. Your 12V DC loads are drawing that extra ~2.04 Amps directly from the battery, which the bottom shunt accurately measures.
- Inverter Efficiency Loss: Even if your 12V fridge is clicked off, turning 12V power into 120V power costs energy. That conversion loss shows up on the battery shunt as part of the total draw.
- Always trust the bottom screen (13.17V) as the absolute authority on how much energy is left in your battery. The top screen is just telling you what the voltage looks like after losing volts traveling down the main copper battery cables btween the inverter and the battery.
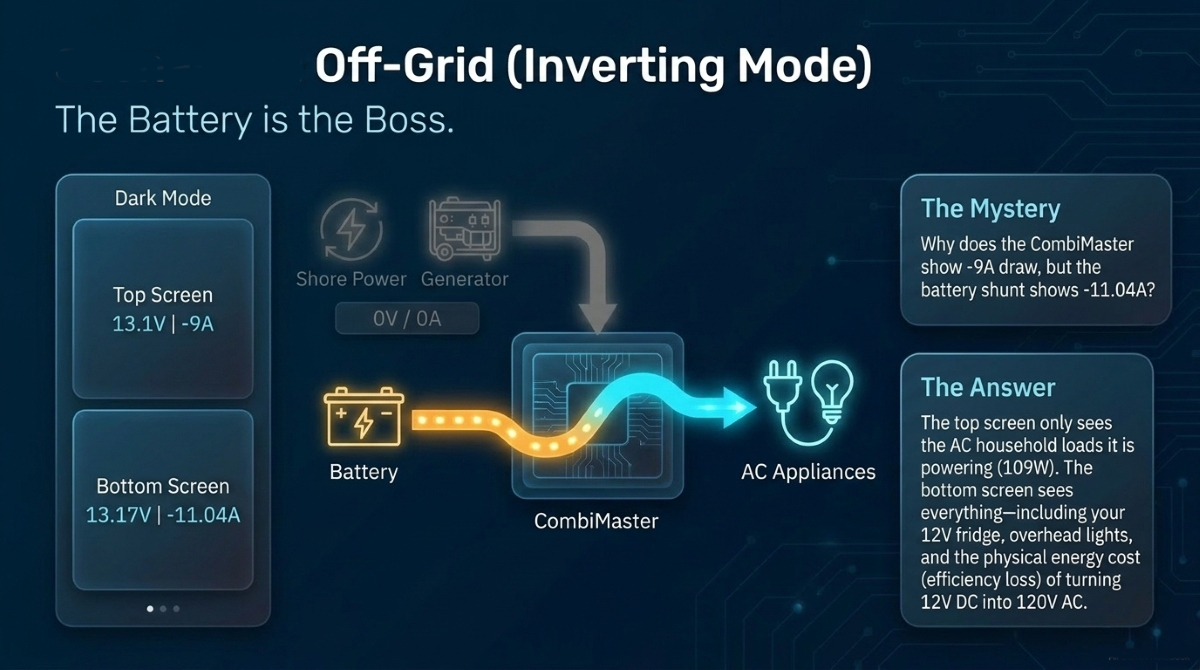
📝 Here is the clean breakdown:
- AC Appliance Demand: 109 Watts (Starlink + other small electronics).
- Inverter Conversion Cost: ~15 Watts of overhead heat loss.
- Total Inverter Battery Draw: 124 Watts / 13.1 Volts = 9.4 Amps (rounded to 9A on the CombiMaster screen).
- 12V House Load Demand (Fridge/Lights): 2.04 Amps of direct DC power.
- Total Net Drain on Battery (Shunt Measurement): 9.4A Inverter + 2.04A House Loads = 11.04 Amps total drain.
Another scenarion. Solar is adding 4A, charger input limit set to 10A and you are plugged into 30A pedestal with Starlink, microwave and A/C running.
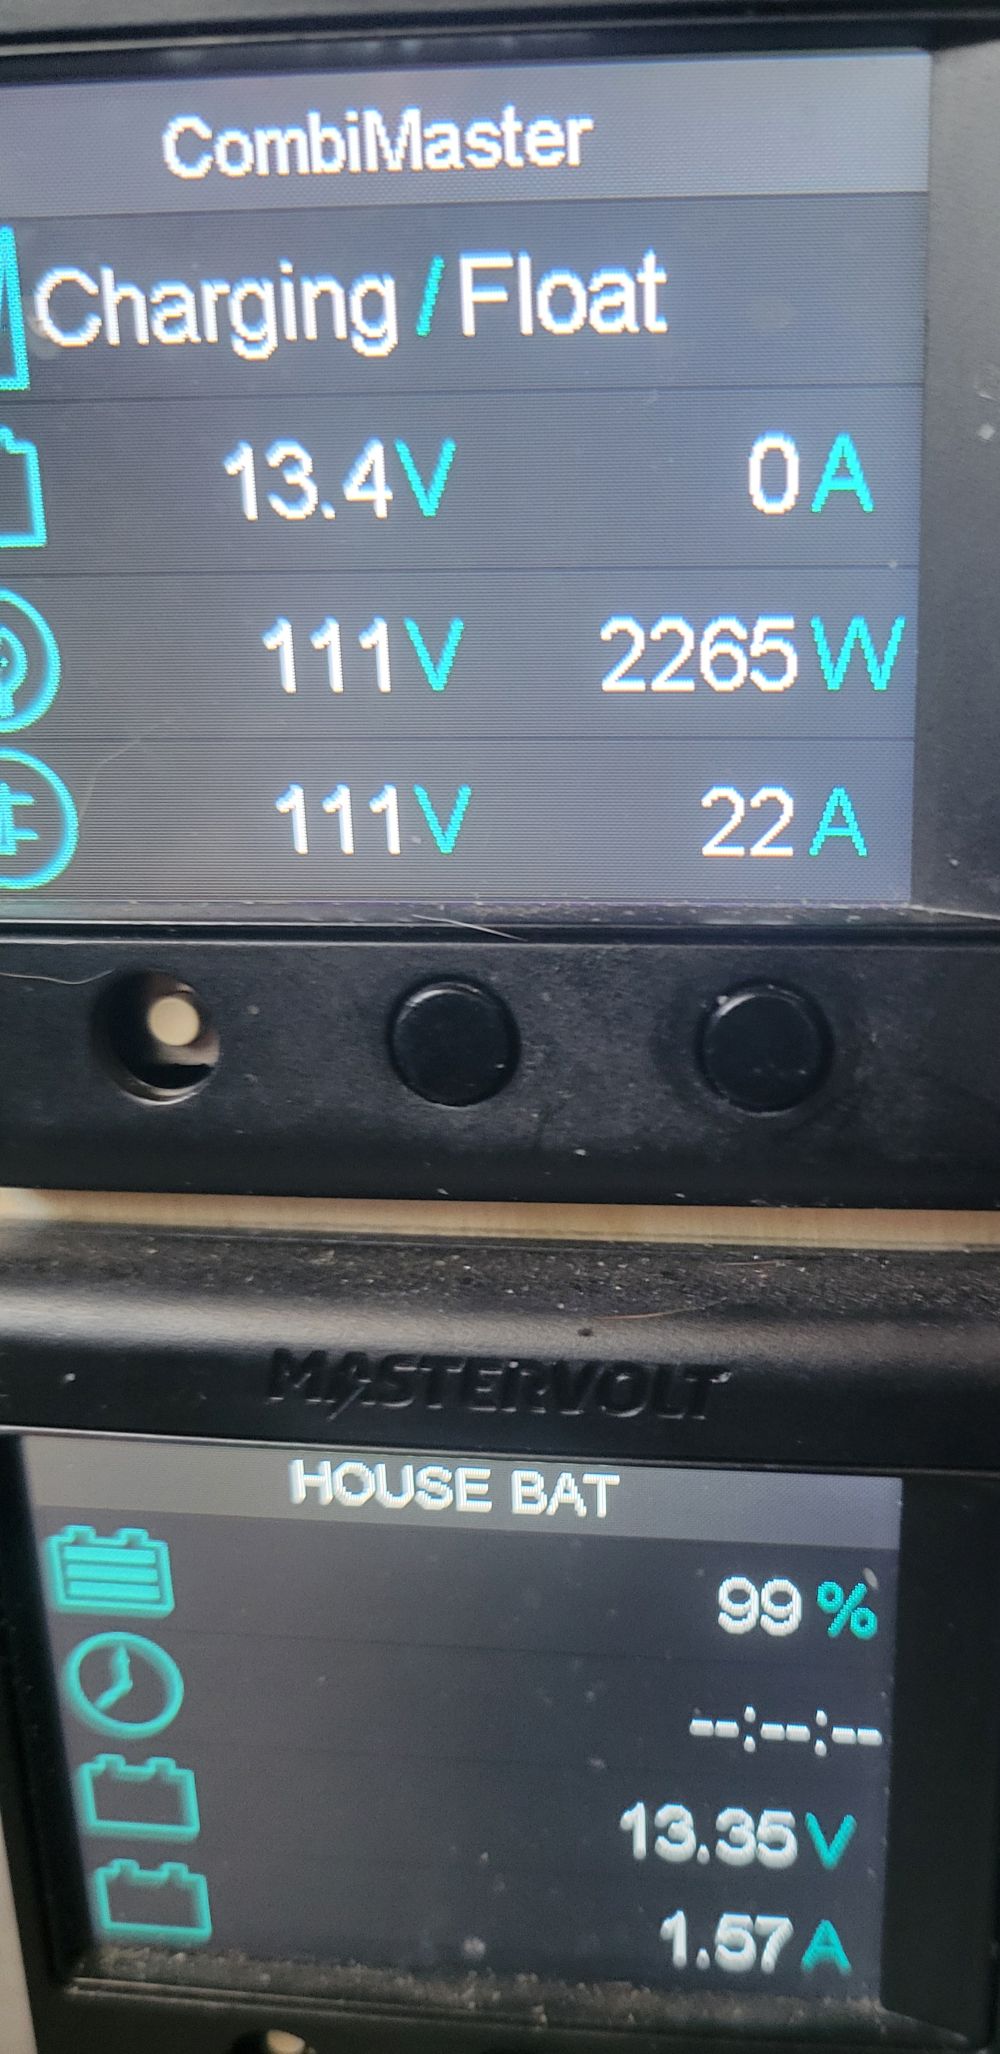
The 22A figure comes from a direct physical measurement combined with the electrical characteristics of your loads:
- Direct Measurement (CT Sensor) Inside the CombiMaster, an internal Current Transformer (CT sensor) sits directly on the AC input line. It measures the actual Root Mean Square (RMS) alternating current entering the unit from shore power in real time and reports 22A.
- The Electrical Calculation (Power Factor) If you calculate basic real power divided by voltage: Current = 2,265W / 111V = 20.4A
The extra ~1.6A (bringing it up to 22A) is due to Power Factor (PF):
- Inductive Loads: Appliances with motors and transformers (your A/C compressor, fan motor, and microwave) cause current and voltage to fall slightly out of sync. This yields an AC power factor typically around 0.90 to 0.93.
- Actual Shore Draw: Shore Current = Real Watts / (Voltage * Power Factor) Current = 2,265W / (111V * 0.928) = 22.0A
- Pass-Through State Because your battery is floating (0A charger output), the CombiMaster’s internal transfer relay is routing all 22A straight from the pedestal to your breaker panel for the appliances, without pulling extra AC current for charging.