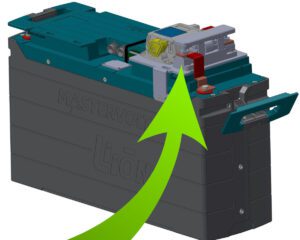
Introduction to Mastervolt and Go Power
I purchased my 2023 Flagstaff E-Pro E20FBS travel trailer with the factory-installed Forest River Power Package, a combination of Mastervolt and Go Power technologies.
Since then, I have made several improvements to get the most out of the Power Package:
- Added two portable Renogy 100W solar panels and a Victron 100/20 SmartSolar MPPT Controller,
- Added a 1600W Honda generator,
- Replaced the clunky Go Power Solar Controller with a Victron 100/30 SmartSolar MPPT Controller,
- Replaced the Microwave with a Galanz Microwave/Air Fryer/Convection model,
- Replaced the 12V TV with a 120V Roku Smart TV (32 inch).
- Got Starlink!
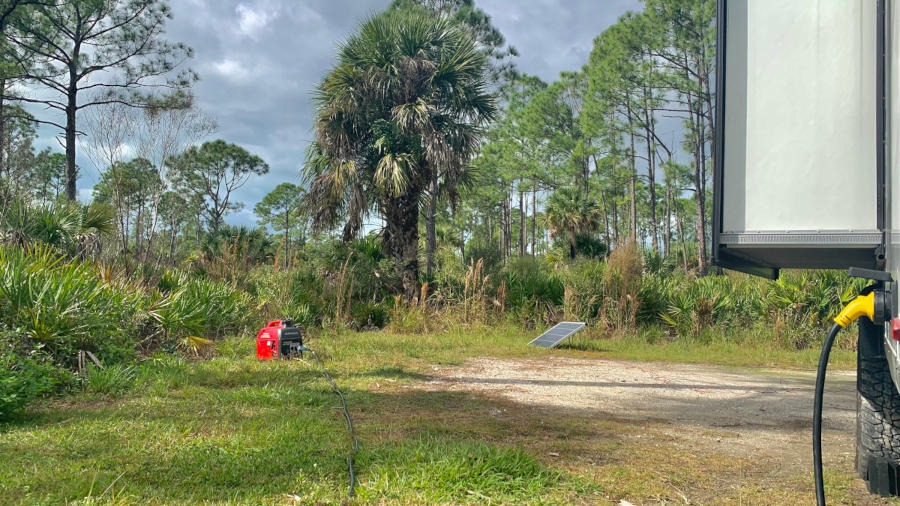
In this article, I explain my usage of the Power Package. I travel full-time and prefer off-grid camping whenever possible. The Power Package allows me to experience the comforts of home while on the road!
For me, the biggest attraction of the Power Package is its seamless operation. It feels as if I am living in a studio apartment – with 24/7 power at my fingertips and the ability to power all my appliances from the air conditioner to the USB ports with a flip of a switch.
It must be said, however, that the Forest River Power Package is an advanced and complicated power system that took many months to figure out; here is how I did it in 4 important steps!
- Power Usage Audit – I documented the power usage of each device in the RV.
- Power Usage Priority List with Rules – I ranked my devices and appliances according to my needs and set usage rules for myself.
- Optimized Charging Options – I accepted the limitations of solar and the benefits of a portable generator.
- Power Package Component Study – I created a drawing of the system in operation and noted the displays and error codes.
After a couple of years in my trailer, I am very satisfied with the Power Package and comfortable with its operation despite the steep learning curve!
Hopefully, this article will help you understand your system a bit better, or perhaps help you decide whether or not to purchase the Power Package upgrade for your new trailer!
Let’s dive into the 4 steps.
1 – Power Usage Audit
Before embracing the nomad lifestyle, I never gave any thought to power usage in my house! I knew nothing about watts, volts, and amperes! I still don’t! But I can spot power-hungry devices, and I’ve learned to avoid them when shopping for RV products!
In the early days of RV living, I bought 12V appliances such as a coffee maker and blender to lower my power usage. I found these to be expensive, bulky, slow, and difficult to replace. Nowadays, I use regular appliances and I will never go back to 12V!
When comparing 120V products to buy, I look at the labels and note the Wattage. Lower Watts are preferred when features are similar.
The internet has endless articles and videos on power and how to measure usage. Most recommend a multi-meter and other tools, but I prefer a simpler method – reading the displays of the Mastervolt Display Panels!
First, I establish what my system can handle:
I look at the battery and inverter specs in my documentation or online. The inverter turns 12V from the battery into 120V to run the appliances! If these numbers are foreign to you, just write them down and they will soon make sense!
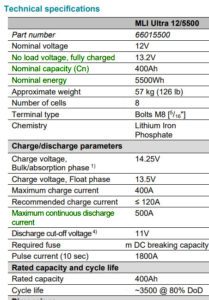
- The battery has 400AH capacity. It’s powerful!
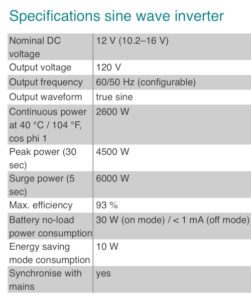
- The inverter’s continuous power limit = 2600W. It can also handle a 4500W burst for 30s!
Second, I measure the power usage of my appliances and devices
At night, with the solar not charging, I turn each 12V device ON and then OFF and note the results on the displays.
For example:
The 12V fridge uses 5A while the compressor is running and 0.4A when in idle mode.
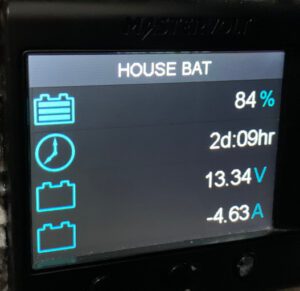
For the 120V appliances, I note the Wattage (inverter display) and % battery loss (on the battery display) while using them as I normally would.
For example:
- The coffee maker is 120V. It takes 8 minutes to brew two cups. The battery display shows 550W. But the key number is the loss – two cups of morning pleasure consumes 2% of battery capacity!
- To toast a slice of bread in my single 120V toaster, use 480W for 1.5 minutes. Two slices are 3 minutes long and consume 1% of battery capacity.
- The 120V microwave consumes 1400W on full power. To cook a meal for 5 minutes uses 3% of battery capacity.
- Starlink uses about 60W (with the heater in OFF)
By using this real-world method over a few days, I get a pretty accurate picture of my power usage and how much battery capacity I need every day to live comfortably.
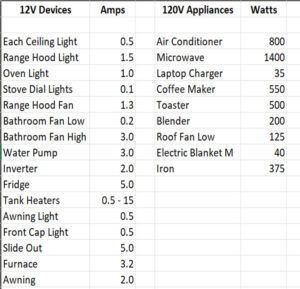
Here are my Power Usage Tables for 12V, and 120V using the Inverter:
2 – Power Usage Priority List with Rules
I learned the following from the 12V table:
- Don’t use the range hood light more than necessary. Replacing it with an LED may void the warranty, so I bought magnetic rechargeable lights for the counter area.
- The fridge has the biggest long-term power draw, but the 400AH battery can handle it easily. It consumes 6% – 10% of battery capacity during a 9-hour night, depending on temperature. The fridge runs 24/7 at 1.5% battery loss per hour (my rough estimate), but probably more during a heat wave.
I learned the following from the 120V table:
- A 900W microwave consumes 1400W using the inverter!
- The soft-start air conditioner uses about 1200W at first, then it settles at 800W
- Together, the air conditioner and microwave consume 2600W when the AC compressor starts, but quickly settle at 2200W – the 2600W continuous limit inverter can handle this as long as I do not start the coffee maker at the same time = 2750W!
Priorities
To be comfortable while camping off the grid, I arrange my appliances and devices in order of importance. The idea is to always have enough battery capacity to power the following crucial devices/appliances. I worry about the rest only when needed, but I always plan ahead!
- Fridge (most important)
- Lights
- Water Pump
- Coffee Maker (two cups in the morning)
- Starlink
- Laptop (charge once a day)
- USB Ports – cell phone, iPad, reading lights, small fans, etc.
- Microwave (explained below)
Convenience versus the battery
When preparing meals, I think about the convenience of microwave cooking and the inconvenience of cleaning dirty cookware! Water is always limited, and dealing with trash, especially cooking oil and food scraps, is a major concern while camping in the wild.
I love popcorn, “steam-in-the-bag” vegetables, and many of the healthy meals available for the microwave. It is about options – and with the Power Package, I can choose to prepare a meal outside over a fire, in the propane oven, on the propane stove, or in the microwave. The microwave is an essential appliance for me, and my system can easily handle many microwave sessions per day.
The upgrade to an affordable Microwave – Air Fryer – Convection combo unit gives me even more options! I do not like to use propane for cooking inside the trailer. It is inconvenient because I use the oven for storage, and I need counter space while cooking!
My daily morning routine starts with coffee! I know many travelers use a French Press to save power, but I love the sound and smell of coffee brewing while I snuggle in bed!
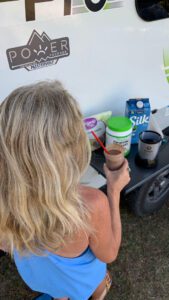
The Magic Bullet Mini blender is an essential appliance for a healthy diet. A smoothie is a delightful meal replacement, and I use my blender to whip, chop, and grind! Plus, its diminutive profile is ideal for the tiny kitchen in my trailer.
When using the AC, I monitor the display to see how long the battery will last under the current load. Imagine running the AC without a noisy generator! I love this capability of my system! Please read below for more information about my AC usage.
I supplement my income with temporary jobs while on the road. Several of these jobs have dress codes, meaning I must iron my shirts and pants! My tiny Steamfast iron works great and consumes only 375W.
Power-hungry appliances such as the coffee maker, air conditioner, travel iron, blender, and electric blanket are conveniences that keep me happy, healthy, and comfortable. The truth is, I want all of these to live full-time on the road. This is why I paid extra for the Power Package.
Having enough battery capacity to use these convenience appliances requires planning and discipline! I explain my process below in the “Charging” section.
Rules
- To ease the charging process, I try to keep the battery above 60% charged at all times. Given the overnight 10% discharge on warm nights from the fridge and 2% from the coffee maker in the morning, and occasional water pump/lights usage during the night, my 1st rule is to have the battery above 75% before going to sleep every night.
- By using the numbers from the Usage Tables, my 2nd rule is not to exceed the limits of the inverter. The inverter will trip its 30A breaker.
- Switch the Inverter OFF when not needed. This saves 2A, or 4% overnight.
- Keep an eye on the Mastervolt Battery Display Panel. Keep track of the battery percentage and time left. Never deplete the battery!
3 – Optimize the Charging Options
Note – my Honda generator can charge the battery (10% per hour) and run everything in my trailer, including the AC (under strain). Still, I prefer to limit my generator usage because it defeats the purpose of living in the silence of nature. Another reason why I paid extra for the Power Package.
On paper, powering my high-priority devices/appliances should not be difficult because the 400AH battery has enough capacity, and the 800W solar panels should keep it charged above 60%.
In reality, keeping the battery charged between 60% and 100% is far more challenging than expected, especially when using power-hungry appliances!
There are mainly 4 reasons why the charging process is challenging:
- I prefer off-the-grid camping over campgrounds with electric hookups
- The weather is rarely perfect
- Many camping areas are under trees in shady spots, especially in the East
- Parking the trailer for maximum exposure to the sun is nearly impossible.
How do I overcome these challenges?
Avoid extreme weather
I am a nomad with the freedom to choose where and when to be comfortable. There is no need to brave the Florida summers or the winters of North Dakota!
My perfect range is below 85 degrees during the day and between 45 degrees and 55 degrees at night.
Regardless of my location, I watch the weather closely and prepare for the days ahead. During an unexpected hot spell, I may pack up and move away, or do what I can to keep the battery at full capacity to run the AC during the heat of the day.
Should the temperature unexpectedly fall below freezing for a night or two, the 12V propane furnace is efficient without draining the battery overnight.
Avoid parking in the shade
I use Google Satellite Maps to research camping areas before arrival. I do not like camping under trees for several reasons, but mostly because I need sun for my solar panels.
The eastern half of America is very challenging for solar, and I often spend hours looking for campsites that suit my needs.
I invested in a portable 2x100W solar panel kit with a 30-foot cable that connects to an external solar port. While the trailer is in the shade under a tree, I often get more than 8A out of the portable panels in a sunny spot nearby. Two portable 200W panels are in my future!
If I have to camp in a shady spot, I park far away from other campers to run my generator with minimum disturbance.
Position the Trailer correctly
On the roof, there is a 200W panel on the door side and 2x200W panels on the side of the slide. Due to the angles of the roof, it is impossible to achieve optimum exposure to the sun for all panels at any given time. Whenever possible, I position the trailer with the slide out (400W) exposed to the track of the sun. Then I position the 2x100W portable solar panels.
I even point the slide to the sun when I stop for a break or while shopping at Walmart, for example.
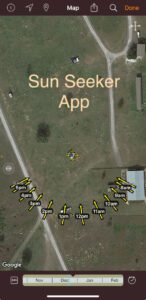
I use the Sun Seeker App on my phone to see the track of the sun. Every location is different, but when mornings are sunnier than the afternoons, I position the trailer to optimize the morning sun. I watch my portable panels and adjust them often.
There is another reason for keeping the sun away from the side with the door – the fridge is on the door side, and it cools more efficiently when not exposed to the heat of the sun.
Despite my best efforts to position the solar panels to the sun, I sometimes have to consider the power of the wind, and then I must shift my priorities. Out in the deserts of the west, wind gusts above 45 mph are not uncommon, and the trailer is more stable when pointing into the wind. Decisions, decisions!
Manage the Inverter
The 3000W Mastervolt Combimaster Inverter/Charger is the puppet master of the Power Package. It powers the 120V receptacles and appliances in my trailer, and it charges the battery.
While out in the wild, I generally do not need 120V appliances and devices at night while sleeping, and the Combimaster Inverter can be switched off, saving about 4% of battery capacity overnight.
Starlink is a lifesaver out in the wild, but it uses quite a bit of power so it turns OFF when the Inverter shuts down.
Use the generator
Despite my best efforts, solar is not a dependable source of power, and I cannot sustain this lifestyle without a generator. This is my reality because the weather is unpredictable, and many camping areas are shady, especially along the East Coast.
In Arizona during the Spring, when the days are mostly sunny with highs topping out in the 80s and lows at night in the 40s or 50s, I do not need the generator! Usually, the solar system charges the battery to 100% before 2 pm daily!
During the monsoon season in the desert, highs can reach 100 degrees with cloudy conditions in the afternoon. A generator is necessary to supplement the solar due to high AC usage.
The Honda is quiet,and I generally hear other generators even while mine is running. Still, I do not like the sound of generators, so I developed a charging plan to limit usage. By managing power consumption and optimizing the solar panels as much as I can, my 60% charged rule makes it easier to keep the battery sufficiently charged.
On sunny days, when fully exposed to the sky, I don’t run the generator, but when solar fails, the schedule is:
- One hour in the morning before 10 am – 10% battery gain,
- One hour in the afternoon before 2 pm – 10% battery gain,
- One hour in the evening before 6 pm – 10% battery gain.
In total, 10% x 3 = 30% gain to lift the battery capacity from 60% to 90% before I turn in for the night.
Are there other charging choices?
Unless I install additional equipment, the vehicle alternator is not an option because of the Lithium battery requirements. I am considering a DC-DC battery charger upgrade for my tow vehicle.
Just give up and book a campground
There are times when it makes sense to book a campground with power hookups. If the weather forecast calls for a week of clouds with rain and there is nowhere to go for hundreds of miles in any direction, I just do the unthinkable for a night or two.
While at a campground, I make the most of my time there. I use the dump station, wipe down the RV (not washing!), defrost the fridge, do laundry, update my computer software, take long showers, and try to make new friends by talking to the neighbors! It gets lonely out in the boondocks.
The Air Conditioner
My system is the 11,000 BTU Coleman Mach Power Saver with a soft-start and remote thermostat. It cools the trailer just fine.
With a full battery, in full sun, I can expect to run the AC for 4 – 6 hours, but it depends on the temperature setting and solar charge.
While the Power Package powers the AC fine on hot days in full sun, it is less useful on warm nights when I prefer a cooler setting (72 degrees or lower). The battery capacity is not enough to run the AC through the night. This is why I move to cooler climates in summer with nighttime temperatures in the 60s or lower!
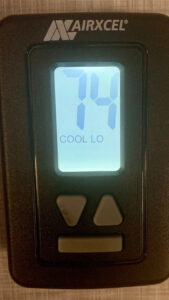
On hot days above 85 degrees, I normally set the thermostat as follows:
- Temperature – 80 degrees
- Cool – On Low
With this setting, the AC fan will run continuously, and the compressor will start and stop as needed to maintain the temperature. When the compressor stops, the fan continues to blow cool air from the fins! The fan is a bit noisy, but it is a constant white noise, and it consumes very little power.
While boondocking, I do not use Cool – Auto because in this mode, both the fan and compressor stop and start while maintaining the desired temperature. I think it uses more power, and the startup and shutdown noises are too loud.
In campgrounds with 30A hookups, I may set the AC to Cool – Auto, but I like the fan to drown out the noisy neighbors.
My 1600W generator is lightweight and quiet, and it can run all my appliances when needed. However, I bought it to charge the battery, and not to power the trailer! That’s the purpose of the Power Package!
While running louder than usual, the Honda 2000i can run the AC fine if I do the following:
- Eco switch OFF,
- Restrict external power to 12A on the Inverter/Charger (see pictures below)
My rule is this:
Run the 1600W generator MOSTLY to supplement the solar system and charge the battery. I use the Inverter to power everything, including the AC. But the generator (remember the 12A power setting) is available to supplement the power.
4 – Understanding the Mastervolt – Go Power System
This is the technical part of the article!
To be honest, I have no interest in the details but to feel comfortable with the system out in the wild, one must have a general understanding of how things work. So I came up with a simple explanation!
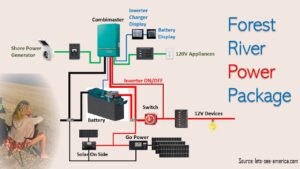
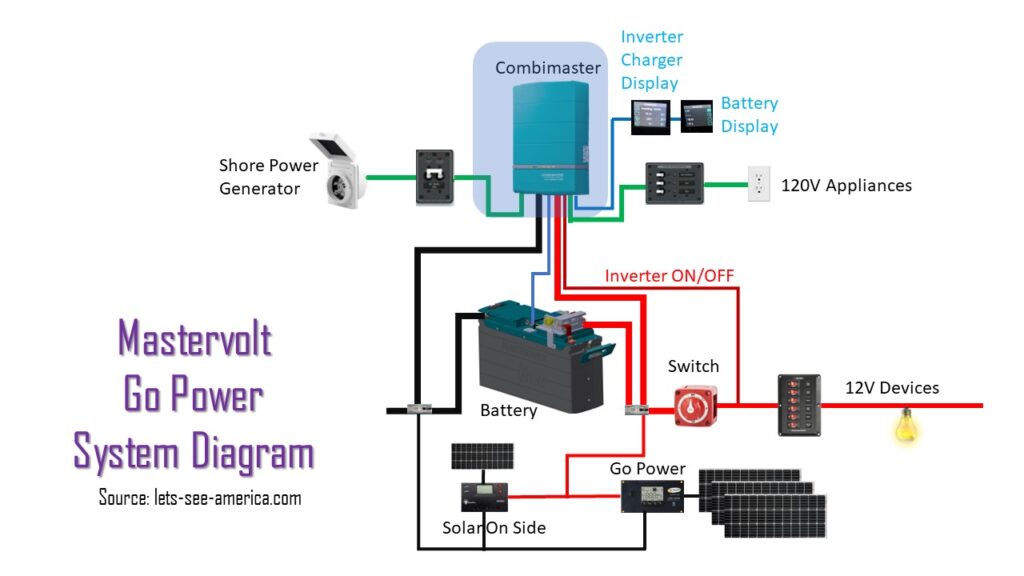
There are 4 main components in the combined system:
- Mastervolt Combimaster Inverter/Charger and 2 Displays
- Mastervolt Battery and Switch – 400AH Lithium – the switch shuts it all down!
- Go Power Solar Panels and Controller – 3 x 200W solar panels on the roof and a controller
- Go Power Solar on Side Port – connected to the battery. I added 2x100W portable solar panels and controller.
Here is my simplified diagram of the system in my trailer.
The Go Power Solar System
This part of the system is easy to understand! It is always on and charges the battery during the day – that’s it.
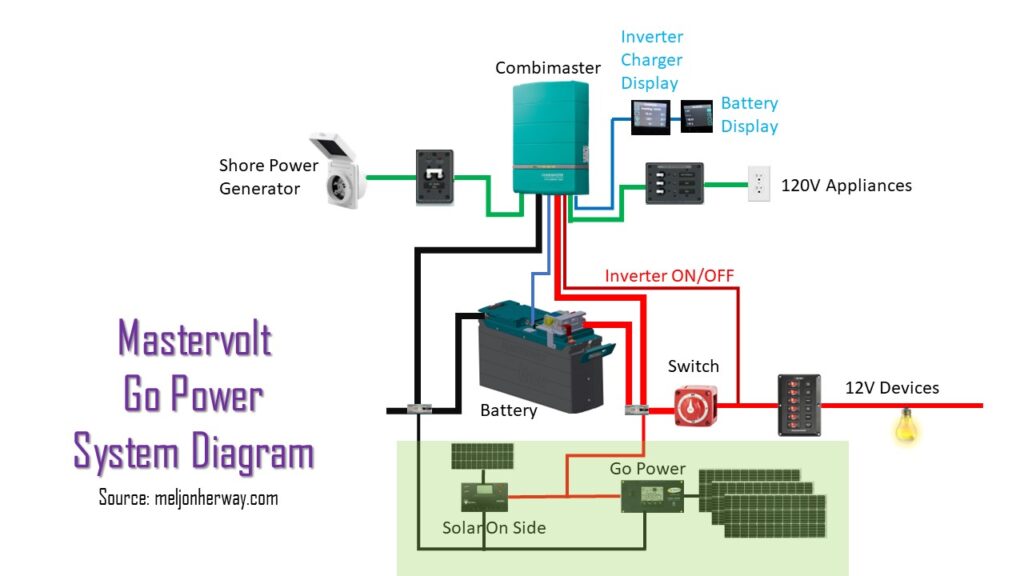
- The Solar on the Side Port and Go Power Controller with three roof panels were factory-installed.
- I added two external panels and a MPPT controller to connect to the Solar on Side Port.
- The two controllers do the same job 24/7 – utilize the sun and solar panels to charge the battery while protecting it from overcharging.
- They have no other function except that both controllers offer a USB port to charge something straight from the sun even when the trailer battery is disconnected.
I keep a casual eye on the Go Power Display to see how many Amps the roof panels are producing. It is useful when positioning the trailer for optimum exposure to the sun.
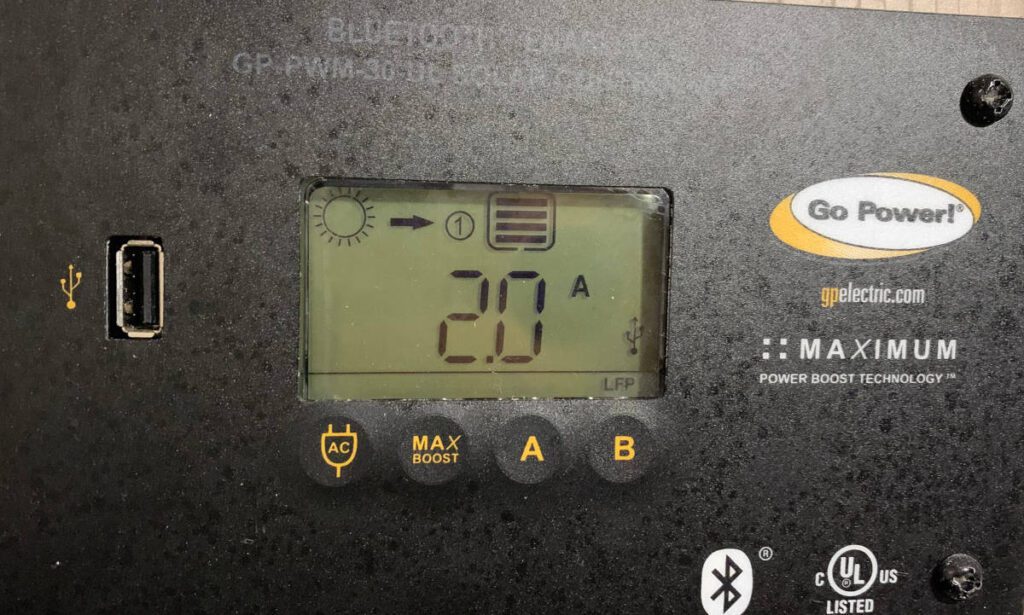
The Go Power controller has a Power Boost function to override the safe charging algorithm to reach 14.4V faster. That’s what they say. I never tried it.
NOTE – I much prefer the 100/30A Victron MPPT Controller and the App on my phone.
The Battery and Switch
There are two switches.
- The Mastervolt 5500 battery is installed with a safety relay switch and fuse for protection. It shuts down automatically in case of issues but it also has a manual switch. I do not have to worry about any of this.
- The standard red RV battery switch (mine is black BTW) is in a weird location in the middle of the front storage compartment and not easy to reach. I never touch it but in an emergency, it’s good to know what it does! It is mainly used when an RV goes into storage for the winter – mine never hibernates!
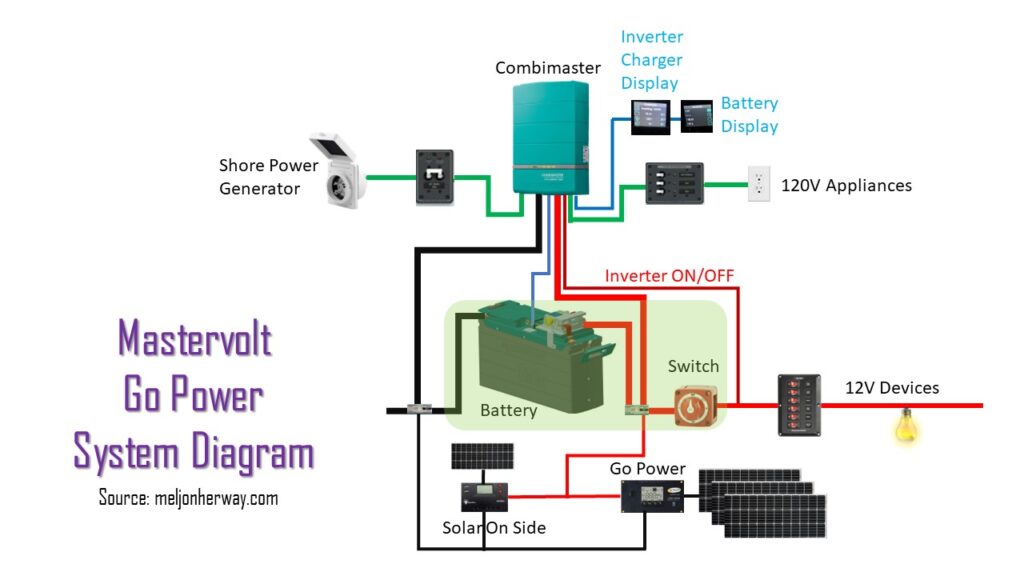
When OFF, the red switch shuts down all power from the battery – whether the trailer is connected to shore power or generator, or not.
- When connected to shore power or generator – 12V devices are OFF, 120V receptacles and appliances are ON because these are powered directly from the source. The Charger is ON.
- When disconnected from shore power – 12V devices are OFF, 120V receptacles and appliances are OFF because the Inverter ON/OFF switch is OFF too.
- Solar controllers continue to charge the battery, regardless of the Switch position.
The blue line from the battery to the Combimaster is for the battery Display Panel – it shows the voltage, etc.
The Combimaster Inverter/Charger
It was factory-installed inside the front storage compartment and it is designed to be worry-free! Access requires the removal of a panel or two.
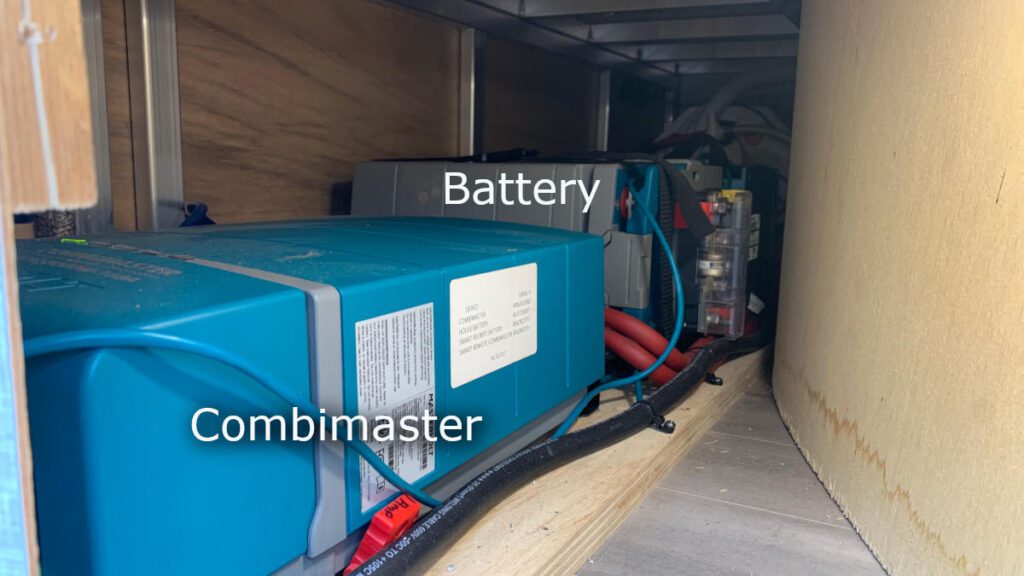
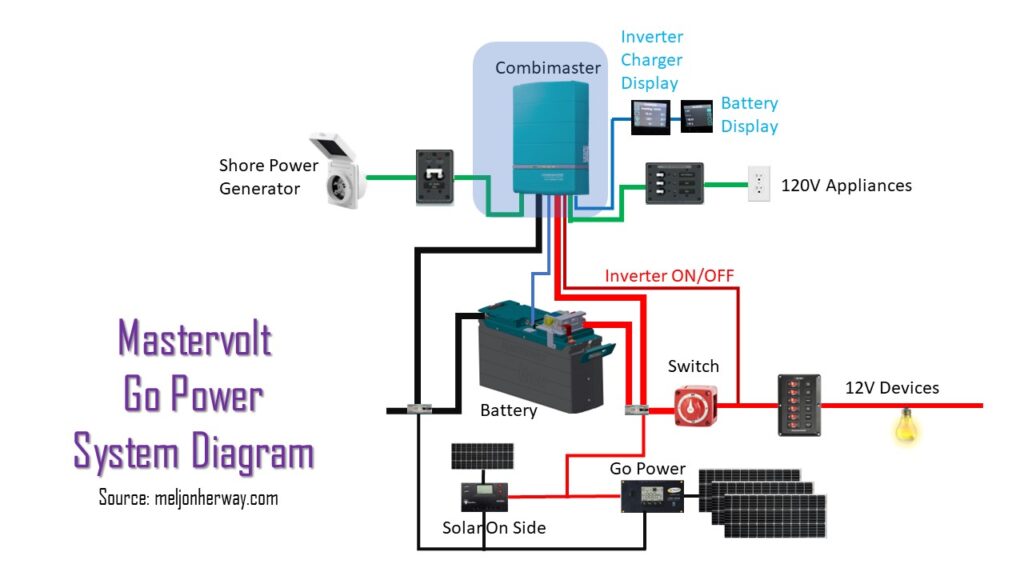
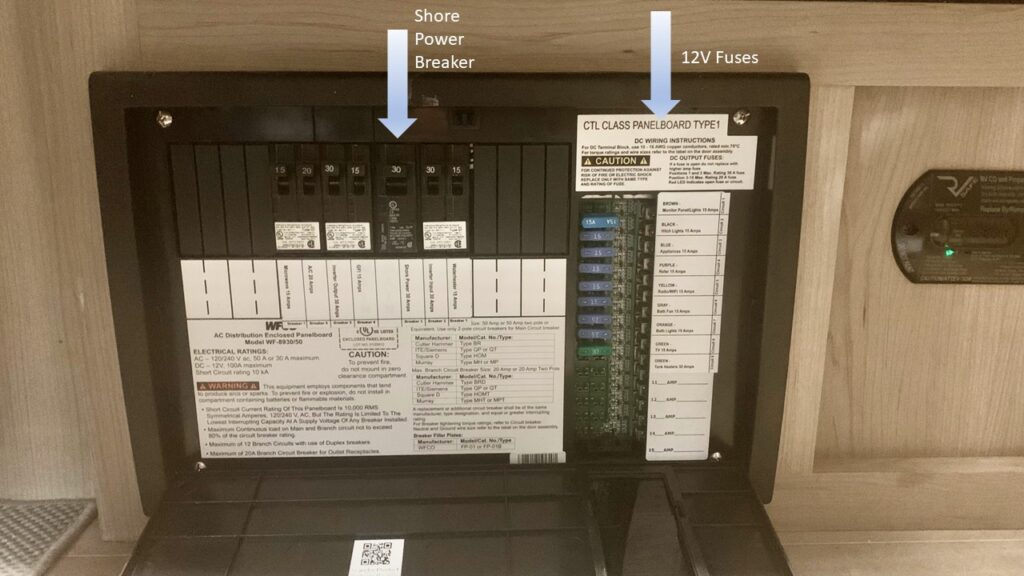
In the system diagram, the shore power or generator input is shown to the left. One can switch off the input power with the shore power breaker switch in the distribution box shown below. On the output side, the main appliances have breaker switches also located in the distribution box.
How 120V is delivered and the battery is charged
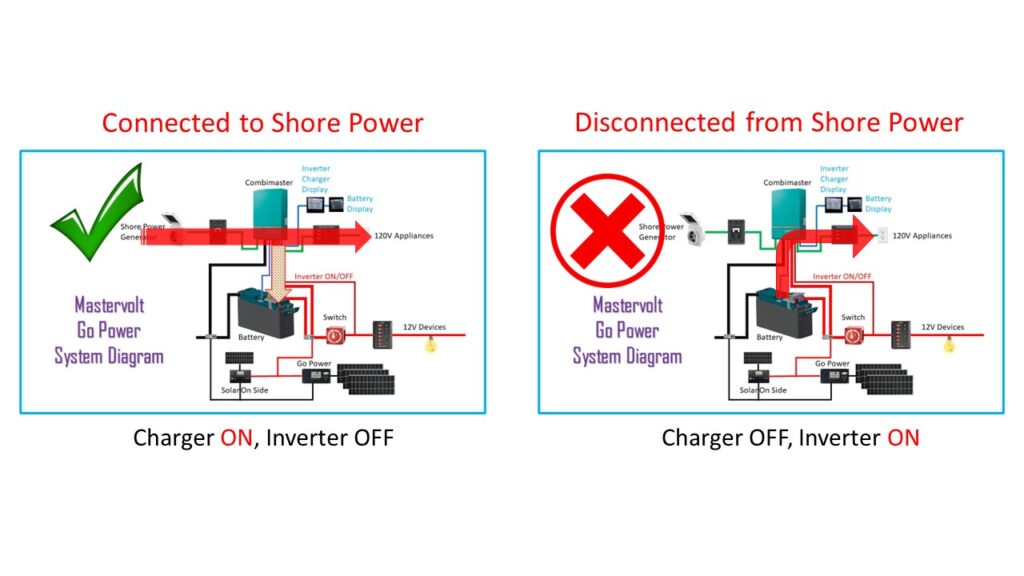
- When connected to shore power or generator – Charger is ON, Inverter is OFF. 120V receptacles and appliances are powered directly from the outside source.
- When disconnected from shore power – Charger is OFF, Inverter is ON unless switched OFF via the Display Panel or red battery switch. When ON, 120V receptacles and appliances are powered from the Inverter and battery.
- Solar controllers continue to charge the battery, regardless.
SmartRemote Panels
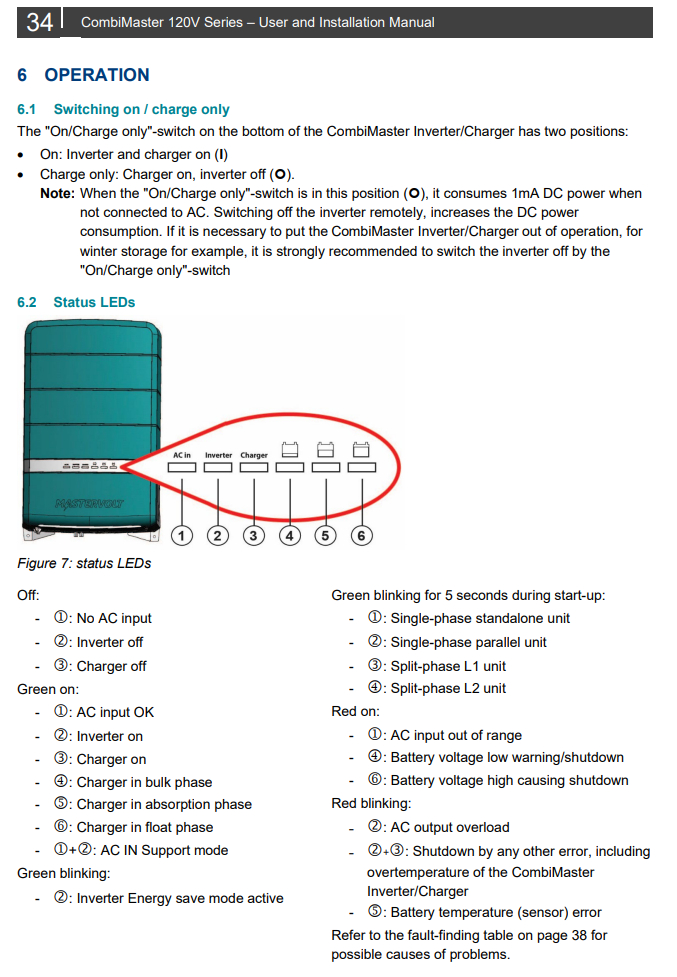
I communicate with the Combimaster via its two Display Panels and I can access the Status LEDs on the device in case of problems.
SmartRemote Inverter/Charger Display Panel
It has two settings that can be changed.
- Press P1 to switch the Inverter OFF or ON. I do this at night to save battery power when I do not need 120V appliances.
- Press P2 or P3 to change the AC IN LIMIT (A). This Power Assist function prevents tripping of the mains fuse in case you’re connected to a weak landline or small generator. I set it to 30A at campgrounds, 12A for my generator and at a friend’s house.
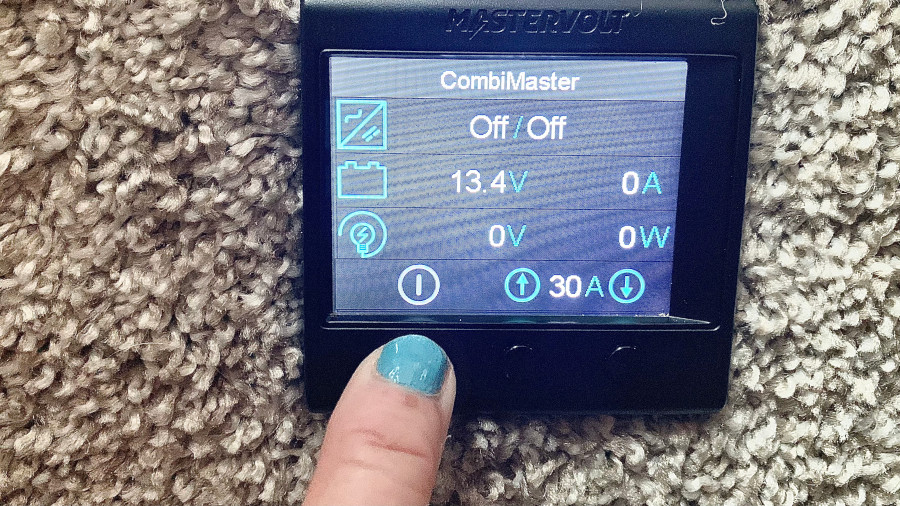
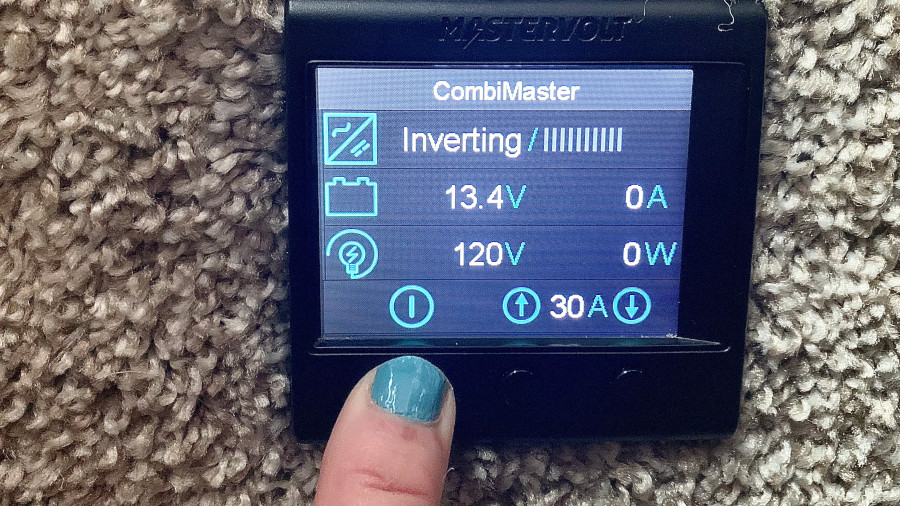
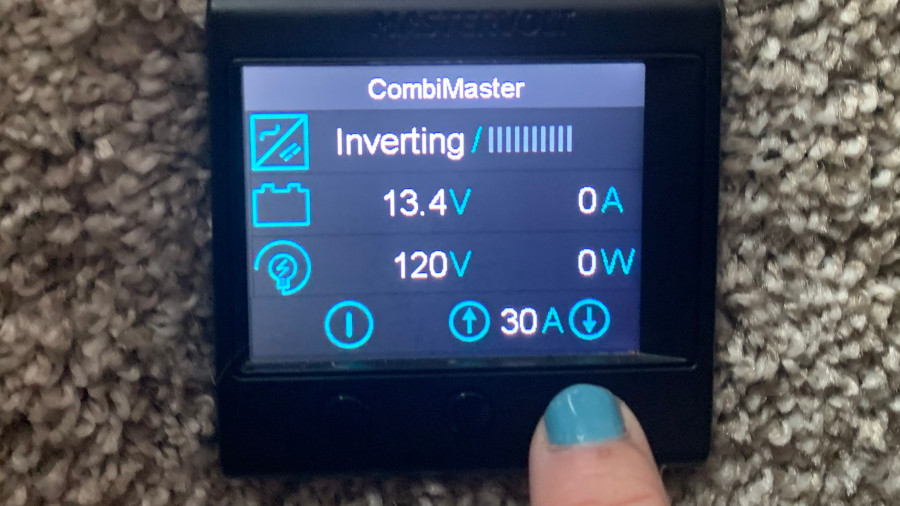
The display also shows:
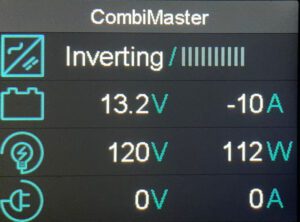
- The Combimaster state – Inverting or Charging (bulk, absorption or float)
- The Output Power Draw (W) – total output power drawn by all 120V appliances,
- The Input Power Current (A) – input power drawn from the shore power receptacle or generator
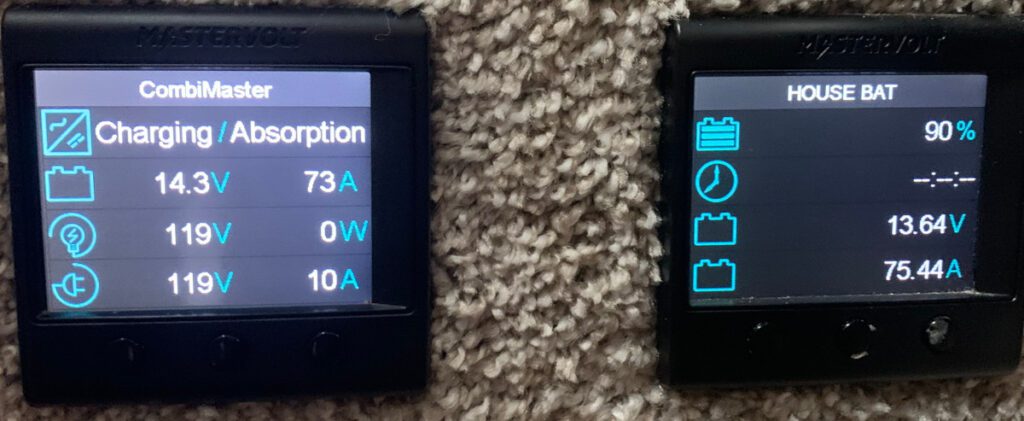
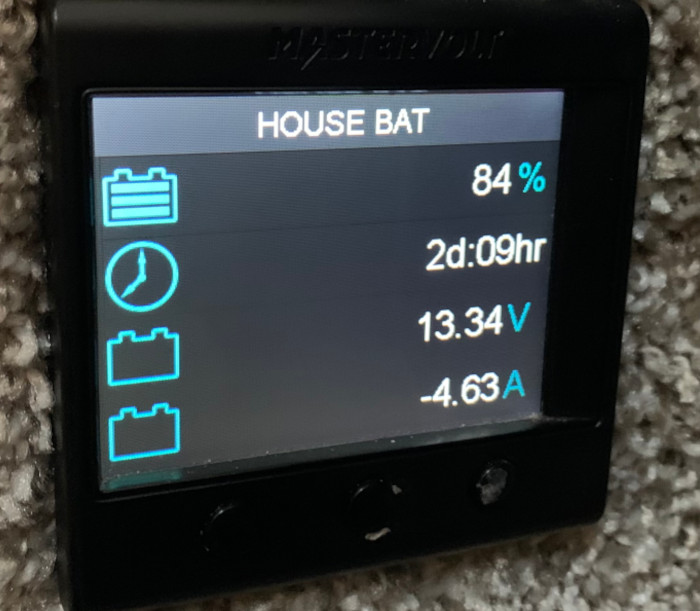
SmartRemote Battery Display Panel
It has no settings that can be changed but I look at this panel throughout the day. It is my main source of information about the power system.
- Battery State of Charge (SOC) – percentage charged. My rule is to stay above 60%.
- Battery State of Charge – time remaining at the current load before 0% charged!
- Battery voltage (V)
- Charging current (A) – Combined current from everything! Incoming from shore power and solar MINUS power draw from Inverter and 12V devices. When negative, there is no need to panic but I will assess the situation to ensure the SOC stays above 60%.
Combimaster Status LEDs
I am not expected to change any settings on the device but it is nice to know what the Status LEDs mean in case of problems. This will help to troubleshoot the system.
In Conclusion
For anyone not technically confident to install a powerful solar and inverter/charger system, the factory-installed Power Package is highly recommended.
By following a few basic rules as I explained above, the system runs seamlessly and your trailer is truly a studio apartment on wheels.
While the operation of the Power Package is seamless, keeping the 400AH battery charged is challenging due to the limitations described above.
For full-time travel, when using the 120V conveniences, you will certainly need a generator and a portable solar addition.
Where to go for help
My system was factory-installed and it’s been over a year without issues! When the time comes for upgrades, I plan to contact ABC Marketing in Elkhart, IN. They have rave reviews and are very active on social media to answer questions and offer advice.
We monitor the Facebook Group – Rockwood Flagstaff Power Package Owners and Fans – and I highly recommend joining if you plan to purchase a Power Package.
Special Thanks
My partner Eben contributed the technical details to this article. Thank you!
Author – Melinda Darvas

